Five things you should know in AX Client
New to Analytics Exchange or upgrading from a previous version? Use this quick start to get familiar with AX Client.
Note
To complete this quick start, you require an installation of AX Client and an instance of AX Server to connect to.
Sign in and connect to AX Server
AX Client connects to AX Server so that you can interact with the content on the server. The first thing you need to do is tell AX Client which AX Server instance to use.
- Start AX Client.
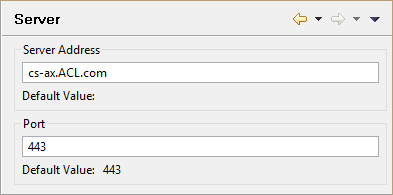
- If the Server page of the Options dialog
box appears, enter the Server Address provided
by your administrator and click OK.
Use the server host name rather than the IP address:

Note
The Options dialog box is only displayed if you did not enter the server address for AX Server during AX Client installation. In the dialog box, leave the Port number at the default value of 443 unless otherwise instructed.
- If you are required to enter your account information,
the Connect view is displayed. Enter your Username and Password and
click Sign in.
User account Credential format Default domain account username Non-default domain account domain\username Local Windows account where AX Server is installed computerName\username If you cannot connect to AX Server, or if there are error messages, ensure that you have entered the correct server address and port. If problems continue, contact your Analytics Exchange administrator.
Explore content on AX Server
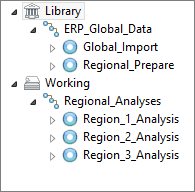
The Server Explorer displays the Library and Working directory on AX Server. All of your audit content is stored in collections and folders inside one of these locations.
On the left-hand pane, expand the Library and Working directory to explore the server contents.

Select View > Refresh from the main menu or press F5 to refresh the contents of the Server Explorer.
Create collections and folders AX Server
From the menu, you can create collections and folders to house your projects in either the Library or the Working directory.
- Select one of the following locations to create the collection and then from the menu select File > New > Collection:
- Working directory
- Library
- Name the new collection and press Enter.
- Select the new collection, and from the menu select File > New > Folder.
- Name the new folder and press Enter.
Import ACL projects
To get your audit content into Analytics Exchange, you need to import a project created in ACL Analytics. These projects contain the analytic scripts you run on AX Server.
- In the Server Explorer, select the destination folder and then from the menu, select File > Import.
- In the Select Files to Import dialog box, select the ACL Analytics project you want to import from your local machine and then click Open.
- In the Select the Import Destination dialog box, select the destination folder.
- Select whether or not to Import source data files (.fil files).
- Click Import.
Schedule analytics
After you have imported project items and analytic scripts to AX Server, you can schedule them to run on a recurring basis.
- In the Server Explorer, select the analytic you want to schedule and then from the menu, select Analytics > Schedule.
- If the analytic requires input values, select one of the following ways to define the input values:
- Use an existing set select a previously created input value set that includes all the required values and click Next
- Copy an existing set select an existing input value set to copy as the basis of a new set, enter a name to assign to the copy, and click Next
- Edit an existing set select a previously created input value set you want to edit and click Next
- Create a new set enter a name for the new input value set and click Next to define the values
- If you did not select Use an existing set of input values:
- Enter or edit table, field, or input values as required, and click Next.
Depending on the complexity of the analytic, you may need to enter several pages of information. To exclude optional input values, select Do not pass a value to the analytic.
Note
If multiple input values can be entered in a single field, press Enter after each value so that each value is on a separate line, unless the analytic instructs you to do something else.
- In the Confirm Analytic Input Values page, confirm the information you have entered is correct and click Next.
- Enter or edit table, field, or input values as required, and click Next.
- Optional. To publish results to AX Exception, in the Publish Results page, select Publish results to AX Exception and then enter the following and click Next:
- Table to publish select the analytic result table to publish
- Entity select or enter an AX Exception entity to associate with the results
- Analytic name select or enter an AX Exception analytic to associate with the results
- Publish select for each table you want to publish to AX Exception
Note
To publish results, AX Exception must be installed and configured for AX Server. If the analytic author specifies which tables to publish in the analytic, these fields are disabled.
To publish more than one table to AX Exception, click Add Row and enter the required information.
- In Set Schedule, specify the analytic schedule and click Next:
- Date select the start date for the analytic job schedule
- Time select the time that the analytic job runs
- Repeat select the repeat frequency for the analytic job
- Optional. Configure a failure notification email:
- In the Email address(es) for failure notification field, provide one or more email addresses to receive the notification if the scheduled analytic fails.
Separate multiple email addresses with semi-colons: john_doe@example.com;jane_doe@example.com.
- To attach the log files from the failed analytic to the email, select Attach log file(s) to failure notification.
Note
Email notification and log file attachments are only available if the required mail server configuration is completed on AX Server by your Analytics Exchange administrator. Email notifications with multiple senders and file attachments may trigger spam filters. For best results, ensure that your IT team marks your AX email from address as Not Spam.
- In the Email address(es) for failure notification field, provide one or more email addresses to receive the notification if the scheduled analytic fails.
- Review the scheduled times for the analytic job(s). Up to ten jobs are listed depending on the frequency. If the scheduled times are correct, click Schedule.