Upgrade standalone AX Server for PostgreSQL
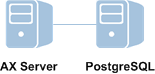
Upgrade AX Server without PostgreSQL if your database is on a separate physical machine. The PostgreSQL database must already be upgraded on a separate server before you upgrade AX Server.
Note
If you are upgrading across multiple versions of Analytics Exchange, contact Support for additional instructions.
Caution
You must install the KB2919355 Windows Updates before starting your Analytics Exchange installation on Windows Server 2012 R2. If you do not install this update, your Analytics Exchange installation cannot succeed.
Download the installer
Note
The installer download page provides the latest version of Analytics Exchange. If you require an installer for a previous version, you must contact Support for a copy of the installer for that version.
- Sign in to Launchpad (www.highbond.com).
Your company's System Admin should have already received sign-in information from notifications@highbond.com. If you are unable to sign in to your Launchpad account, contact your company’s System Admin or Support for assistance.
- Under Resources, click Downloads.
- In the top menu, click Analytics Exchange.
- From the Select software package to download list, select the installer you want
to download.
Note
Ensure that you download the correct edition (non-Unicode or Unicode) as all installed applications must use the same edition.
- Click Download Version <version_number> and save the installer to the computer where you will install the application.
Upgrade AX Server
Install prerequisites
- If you are prompted to install prerequisites, click Install and
wait while the prerequisites are installed.
Follow any on-screen instructions to complete the prerequisite setup.
- To proceed with the upgrade, click Yes.
Complete the upgrade
- In the Welcome page, click Next and in the License Agreement page, select I agree to the above terms and the Galvanize Master Subscription Agreement and click Next.
- If the Analytics Exchange Database Upgrade Required page appears, click Next.
- In the Analytics Exchange Tomcat Service
Account page, do the following and click Next:
- Enter the domain and username for the account
in the format domain\username.
Depending on the version of Windows Server, the installer may include a Browse button for locating the required account. If you browse, you must enter or select the domain or server name first in the Browse for a User Account dialog box in order for the installer to present the appropriate list of available user accounts.
- Enter the Password for the account.
- Enter the domain and username for the account
in the format domain\username.
- If you are prompted to grant the Log on as a service
right to the Tomcat service account, click Yes and
then OK.
For information about the options for configuring service accounts, see Service account configuration.
- To begin the upgrade process, click Install.
When the installation process is complete, click Finish to exit the installer.
The AX Server Configuration web application opens in the default web browser after the installer finishes.
Check AX Server activation
AX Server should already be activated based on your previous installation. If not, you can activate it using the web application. For more information, see Post-installation tasks.
Note
If the AX Server Configuration web application displays an error in the web browser, wait for 2 -3 minutes before reloading the page. Depending on your server hardware, the required services may take a few minutes to be fully functional.
Tip
If you close the AX Server Configuration web application before completing any required tasks, you can access the web application again in a web browser. The default location is:
https://<servername>/aclconfig
where <servername> is the hostname or IP address of your AX Server. For example:
https://axserver.example.com/aclconfig.