The recommended method for developing an analytic script is to first create and test a regular script in Analytics. Once the script is working correctly, add the analytic header to convert the script to an analytic script. Analytic scripts can run in Robots, on AX Server, or in the Analysis App window.
For information about creating regular scripts, see Get started with scripting.
Identify script inputs and outputs
In the analytic header, you use analytic tags to declare script inputs, and any script outputs that you want to make available to end users, or use as input for subsequent scripts. The different types of inputs and outputs are described below, with the associated analytic tags in parentheses.
Tip
Identifying the required inputs and outputs before you begin will make development go more smoothly.
| Inputs | Outputs |
|---|---|
|
|
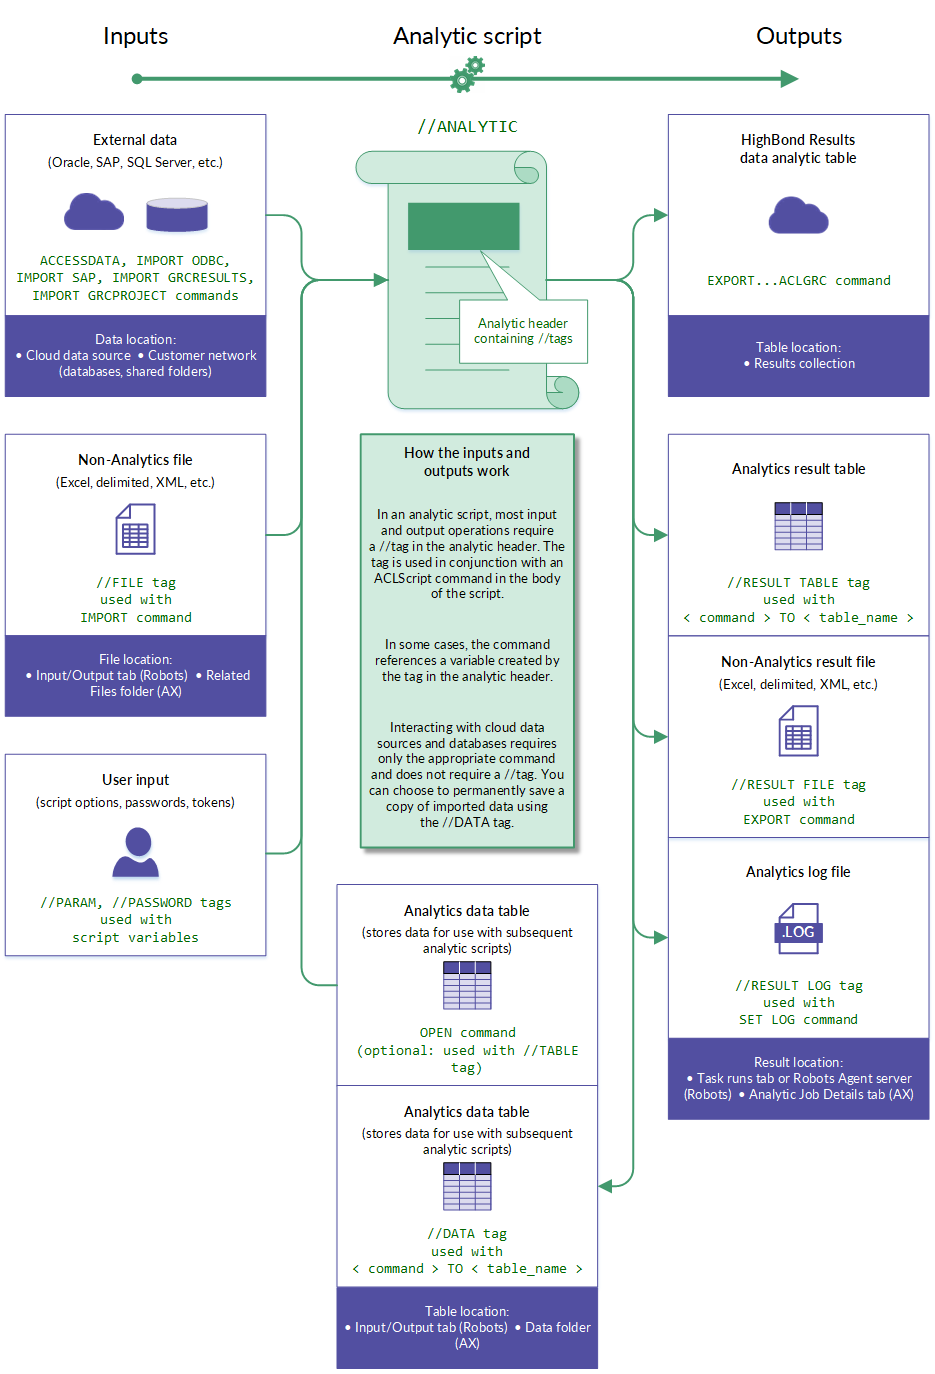
Script inputs and outputs – the big picture
The diagram below illustrates all the possible inputs to, and outputs from, an analytic script. Each input or output shows:
- the type of data or user input involved
- the associated analytic tag (if applicable)
- the associated ACLScript command or commands
- the location of the input or output data, tables, or files
Depending on its design and purpose, a single analytic script might have multiple different inputs and outputs.
Accessing source data
There are two basic approaches to accessing the source data required by an analytic script:
- Automated connectivity
- Manual upload
You are free to use both approaches in the same analytic script, if required.
Automated connectivity
The advantage of this approach is that data imports to Robots or AX Server can be fully automated including being run on a schedule.
In the body of the analytic script, use one of the ACLScript commands for connecting to an external data source, importing data, and creating an Analytics table with a copy of the data:
Note
These commands do not require any corresponding analytic tag in the analytic header.
Use ACCESSDATA unless you have a reason for using one of the other commands. DEFINE TABLE DB is an older command that is maintained for backward compatibility with older scripts.
Manual upload
Manual upload provides a simple way to import data to Robots or AX Server, and it may be appropriate when users have source data files stored locally.
Robots
You can manually upload non-Analytics files such as Excel or delimited to Robots. You need to use a different method to make Analytics tables available.
- non-Analytics files You can manually upload non-Analytics files such as Excel or delimited to the Input/Output tab in a robot. To access the uploaded data in an analytic script, use a FILE tag in the analytic header, and an appropriate IMPORT command, such as IMPORT EXCEL, in the body of the script.
- Analytics tables You cannot manually upload Analytics tables to the Input/Output tab. Instead, use a DATA tag in the analytic header to save an Analytics output table to the Input/Output tab. To access the Analytics table in a subsequent script, use the OPEN command in the body of the script.
AX Server
You can manually upload non-Analytics files such as Excel or delimited, and Analytics tables, to AX Server:
- non-Analytics files You can import files such as Excel and delimited to the Related Files subfolder. To access the imported data in an analytic script, use a FILE tag in the analytic header, and an appropriate IMPORT command, such as IMPORT EXCEL, in the body of the script.
- Analytics tables When you import an Analytics project into AX Server, the project's tables are imported to the Data subfolder. To access an imported table in an analytic script, use the OPEN command in the body of the script.
Workflow for creating and testing an analytic script
Note
The following workflow is a suggested approach for developing analytic scripts, however you are free to develop analytic scripts in whatever manner best suits you.
Create the Analytics script
Create a script in Analytics without using any custom dialog boxes for user input, or any other features that require user interaction during the running of the script. Analytic scripts allow user input prior to running the script, but unlike regular scripts do not support user interaction during script execution.
To store test input values in the Analytics script, temporarily create variables at the top of the script. For example:
ASSIGN v_AnalysisTable = "Trans_May"
Test and debug the script until it executes without errors.
Add the analytic header and tags
Add an analytic header to the script. Copy the variable names from the top of the script to the corresponding tags in the Analytic Header Designer.
An example of a resulting tag in the analytic header:
//TABLE v_AnalysisTable "Table to classify"
For more information, see Working with analytic headers.
Include the log in the analytic script results
The log is a crucial tool for diagnosing the cause of analytic script failures. It can also be important when analytic scripts succeed but give unexpected results. The log is automatically output when an analytic script fails, but it is only output when an analytic script succeeds if you specify the RESULT analytic tag.
In the Analytic Header Designer, turn on Keep log file to ensure that a log is available every time the analytic script is run. The corresponding tag is added to the analytic header:
//RESULT LOG
Validate the analytic header
Validate the analytic header. You can validate the analytic header as frequently as you want.
For more information, see Validating analytic headers.
Assign temporary test values to the analytic tags
Using the special assignment operator ( := ), assign temporary test values to all analytic tags that require user input. You can copy the test values from the temporary variable assignments at the top of the script. For example:
//TABLE v_AnalysisTable "Table to classify" := "Trans_May"
To assign temporary test values using the Analytic Header Designer, enter the value in the Test value field for all analytic tags that require user input.
For more information about assigning temporary test values, see Specifying test input values in Analytics.
Delete the temporary variables
Delete the temporary variables from the top of the script, or comment them out if you think you might want to use them again.
Step through the analytic script
Step through the analytic script
by clicking Step ![]() , or
by pressing F10 repeatedly. Review the contents
of the Variables tab in the Navigator to
ensure that all variables in the analytic header are being created
correctly, with the correct assignment of test values.
, or
by pressing F10 repeatedly. Review the contents
of the Variables tab in the Navigator to
ensure that all variables in the analytic header are being created
correctly, with the correct assignment of test values.
Test and debug the analytic script until it executes without errors.
Note
If you want to exit the analytic script before it completes, press Esc and click Yes in the confirmation prompt.
Tip
You can delete all stored variables and variable assignments from the Analytics project by entering DELETE ALL OK in the command line. Clearing the Variables tab prior to stepping through an analytic script gives you a clean start.
Delete the temporary test values
When you are finished testing, you can delete the temporary test values and the special assignment operator from all analytic tags. Or you can choose to keep them if you anticipate that additional testing might be required. Test values are ignored in deployment environments.
Deploy the analytic script
To deploy the analytic script to the target environment, commit the script to Robots, or import the Analytics project into AX Server.
To deploy the analytic script, commit the script to Robots.
Workflow for testing an analysis app
For analytic scripts that will be run in AX Web Client, or the Analysis App window, you also need to test the analysis app.
Delete redundant table layouts
Once all analytic scripts and any subscripts in the analysis app are tested, debugged, and executing correctly, delete any table layouts from the Analytics project that you are not going to include in the analysis app.
Redundant table layouts will clutter the analysis app in AX Client, AX Web Client, and the Analysis App window, and could be confusing to end users.
Open the analysis app in the Analysis App window
Open the completed analysis app in the Analysis App window by right-clicking the Analytics project entry in the Overview tab and selecting Open as Analysis App.
Note
If the analysis app fails to open and you get an error message stating that analytic scripts have identical names, check the name value in the ANALYTIC tag for each analytic script specified in the error message. The name values of analytic scripts must be unique in an Analytics project.
Run the analytic scripts
Run all the analytic scripts in the analysis app to confirm that they are functioning correctly.
Observe the correct order for running the analytic scripts if you are using the TYPE option with the ANALYTIC tag and creating import, preparation, and analysis analytic scripts.
Check the log
If an analytic script fails, open and review the log file (analytic_name.log). The log should include an entry, marked with a red X, that indicates why the analytic script failed:
- for incorrectly entered input values, immediately re-run the analytic script with a correctly entered input value
- for syntax or logical errors in the script body, correct the error in Analytics, and then reopen the analysis app in the Analysis App window
An analytic script may succeed but the result table may not contain the results you were expecting. In this situation, review the log entries in sequence, and check the input values that have been passed to the analytic script, to ensure that the analytic script is functioning in the manner you intended.
Packaging and validating an analysis app
Package or import the analysis app
Once you are satisfied the analysis app is working as intended, package it for distribution and use in the Analysis App window, or import it to AX Server for use in AX Client or AX Web Client. For more information, see either:
- Packaging analysis apps for use in the Analysis App window
- Packaging analysis apps for import to AX Server
Run AX Server analysis apps
If you are developing analytic scripts for use in AX Server, run all analytic scripts using both AX Client and AX Web Client to ensure they work as intended.