Import Microsoft Excel data to Analytics for analysis using a variety of different tools.
How it works
You use the Data Definition Wizard to select one or more Excel files, specify one or more worksheets to import, and import the Excel data to Analytics. The imported data creates one or more new Analytics tables and associated data files (.fil). Each imported worksheet creates a separate Analytics table.
The Analytics data file contains a copy of the Excel data that is completely separate from the original Excel file.
You can import data from an Excel file even if you do not have Microsoft Excel installed on your computer.
Import a single worksheet or multiple worksheets
You have the option of importing a single Excel worksheet or multiple Excel worksheets in a single operation. The import process differs somewhat, depending on which option you use:
- single worksheet you have the option of manually defining the source Excel data during the import process
- multiple worksheets Analytics automatically defines the source Excel data and no manual definition is possible during the import process
For example, during the import of multiple worksheets, you cannot:
- specify the data type or length of fields
- selectively exclude fields from the import
Once the data is in Analytics, you can make any necessary adjustments to the data definition in the Table Layout dialog box.
Import a named range
Instead of importing an entire worksheet, you can import a named range, which is a defined portion of a worksheet. See the Excel Help for information about creating a named range.
Combine multiple worksheets
After you import multiple Excel worksheets into individual Analytics tables you might want to combine them into a single Analytics table. For example, you could combine the data from twelve monthly tables into a single annual table containing all the data. You can combine the worksheets only after you have imported them into individual Analytics tables.
For information about combining multiple Analytics tables, see Appending tables.
Tip
To reduce labor, try combining the multiple tables first before making any required adjustments to the data definition in the new combined table.
Guidelines
Review the guidelines below to assist you with importing Excel data.
Data types and missing data
To get the best results when importing Excel data, ensure that in each worksheet you intend to import:
- each column contains the same type of data
- there are no blank rows or blank columns
Maximum numbers of columns and characters
Excel 2007 and later
The maximum number of Excel columns, and the maximum number of characters in a field, that you can import from .xlsx or .xlsm files is not limited to a specific number.
Importing from these Excel file types is governed by the record length limit in Analytics data files (.fil) of 32 KB. If any record in the source Excel data would create an Analytics record longer than 32 KB, the import fails.
Note
When the new table opens in Analytics, a maximum of 256 columns are displayed in the default view. If the table contains additional columns, you can manually add them to the view, if required.
Excel 97 – 2003
The import of .xls files (Excel 97 - 2003) uses an older type of processing, and is subject to the following maximums:
- 255 columns
- 255 characters per field
- 32 KB per record
- 65,000 rows
Supported versions of Excel
You can import data from any version of Excel from Excel 3.0 to Excel 2016.
If you want to import data from an earlier version of Excel, you need to save the Excel file to another file format that Analytics can import, such as .csv.
Excel Protected View
Analytics cannot import from an Excel workbook if Protected View is active for the workbook. You must first enable editing in the workbook, save and close the workbook, and then perform the import.
Web-based Excel files not supported
Analytics does not support directly importing Excel files created from web applications such as Google Sheets. You must first open the file in Excel, save it under a different file name, and then import the new file using Analytics.
How overwriting works
If you import Excel data and create a new Analytics table that has the same name as an existing table in the Analytics project you have the option of overwriting the existing table.
Both parts of a table overwritten
Overwriting of Analytics tables is complicated by the fact that both parts of a table can be overwritten:
- the table layout, displayed in the Navigator
- the associated source data file, stored in a Windows folder
(For information about table layouts and source data files, see The structure of Analytics tables.)
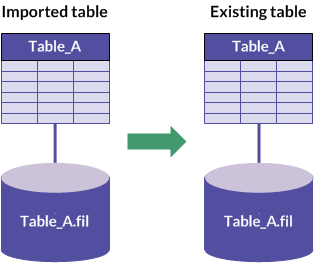
The two parts of the table are overwritten independently of each other. If both parts have the same name as the new table, both are overwritten. This scenario is the most common.
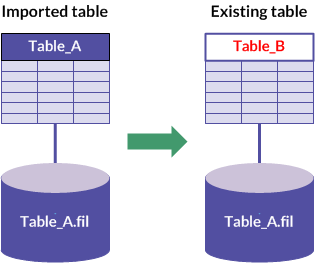
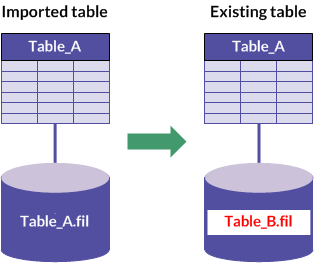
But if the table layout and the source data file have different names, only the one with the same name as the new table is overwritten.
This overwrite behavior applies whether you are importing a single Excel worksheet, or multiple worksheets.
Overwriting when importing multiple worksheets
When you import multiple Excel worksheets, overwriting also depends on both the Overwrite existing tables and Output Path settings.
The sections below summarize the different possible outcomes of overwriting when importing multiple worksheets, starting with the most common scenario.
Same name: new table, existing table layout, existing source data file
|
Same "Output Path" as existing source data file |
Different "Output Path" from existing source data file |
|
|---|---|---|
| "Overwrite existing tables" selected |
|
|
| "Overwrite existing tables" not selected |
|
|
Different name: existing table layout
|
Same "Output Path" as existing source data file |
Different "Output Path" from existing source data file |
|
|---|---|---|
| "Overwrite existing tables" selected |
|
|
| "Overwrite existing tables" not selected |
|
|
Different name: existing source data file
|
Same "Output Path" as existing source data file |
Different "Output Path" from existing source data file |
|
|---|---|---|
| "Overwrite existing tables" selected |
|
|
| "Overwrite existing tables" not selected |
|
|
Import a single Excel worksheet
Import a single Excel worksheet, or named range, to create a new Analytics table. You have the option of manually defining the source Excel data during the import process.
Note
Make sure the Excel file is closed before you begin the import process.
Locate and select the Excel file
- Select Import > File.
- In the Select File to Define dialog box,
locate and select the Excel file and click Open.
Microsoft Excel files have an .xlsx or an .xls file extension.
- In the File Format page, verify that the Excel file option has been selected and click Next.
Specify the worksheet to import
- In the Data Source page, select the worksheet or the named range to import.
Note
To see any named ranges, deselect System Table Only.
Worksheets are identified with a dollar sign ($) appended to the worksheet name. The dollar sign is added temporarily, and does not appear in the Analytics table name.
- Review the default settings on the page, make any required updates, and click Next.
Setting Description Use first row as Field Names Values in the first row in the worksheet or the named range are used as field names in the Analytics table.
Note
If you use this setting, the row used as field names is whatever line number is specified in Start On Line.
Start On Line The line number on which to start reading the worksheet.
This setting allows you to skip lines at the beginning of a worksheet that contain information you do not want to import. For example, if the first three lines of a worksheet contain header information, enter 4 to start reading data on the fourth line.
Note
The start line for a named range is always the first line in the named range, regardless of the Start On Line setting.
Import all fields as character type Assigns the Character data type to all the imported fields.
Tip
Assigning the Character data type to all the imported fields simplifies the process of importing Excel files.
Once the data is in Analytics, you can assign different data types, such as Numeric or Datetime, to the fields, and specify format details.
Import all fields as character type is useful if you are importing a table with identifier fields automatically assigned the Numeric data type by Analytics when in fact they should use the Character data type.
First 100 records Analytics uses only the first 100 records in the worksheet or the named range to determine the data type of fields, and the length of fields, in the Analytics table.
With large Excel files, using First 100 records significantly speeds up the import process.
Caution
Select this option only if you are confident that values in the first 100 records accurately reflect the data type and length of all subsequent values.
If any values after the first 100 records are of a different data type, or are longer, the resulting Analytics table will contain inaccurate or truncated data.
Inaccurate or truncated data in critical fields will very likely invalidate the results of subsequent data analysis.
Entire Excel Worksheet or Named Range Analytics uses all the records in the worksheet or the named range to determine the data type of fields, and the length of fields, in the Analytics table.
With large Excel files, using all the records to determine data type and field length significantly slows down the import process.
Note
Select this option if you are uncertain about the consistency of the data types or the length of values in the Excel data.
Edit the Analytics field properties
Analytics makes a best guess about the properties associated with each field in the Excel data. You can accept the default settings, or follow the steps below to manually define the fields.
- In the Excel Import page, select each column heading in the preview table to see the properties associated with the field.
- For each field, review the settings assigned by Analytics to the properties listed below, and make any required updates.
- When you have finished reviewing and editing properties, click Next.
| Property | Description |
|---|---|
| Ignore this field |
The data in the field is not imported. |
| Name | The name for the field in the table layout. You can keep the name assigned by Analytics, or enter a different name. |
| Column Title | The column
title for the field in the default Analytics view. If you do not specify a column title, the Name value is used. |
|
Length |
The length of the field in the table layout. Specify the length in characters. If a datetime field has no time data and displays 00:00:00 after the date, you can shorten the length of the field to omit the empty time data. Note Maximum field length is 32,767 characters (non-Unicode edition) or 16,383 characters (Unicode edition). The entire field length, up to the maximum, is imported into Analytics, but only the first 256 characters are displayed in the table view. The remainder of the data is present, and can be analyzed, but it is not visible in the view. To see all the data, open the Table Layout dialog box. Tip Increase the length of a field if you selected First 100 records in the previous screen, but you are uncertain about the length of subsequent values in the field. |
|
Note If you selected Import all fields as character type in the Data Source page, the options below do not apply and are disabled. |
|
| Type | The data type assigned to the field in Analytics. You can keep the data type assigned by Analytics, or select an appropriate data type from the drop-down list. |
| Value | A read-only property that
displays the first value in the field. The value dynamically updates based on any edits you make. |
| Decimal | Numeric fields only. The number of decimal places in the source data. Note The Decimal text box appears automatically when you select a Numeric data type. |
| Input Format | Datetime fields
only. The format of datetime values in the source data. Select a format that matches the data, or if necessary create a format to match the data. The format you specify must exactly match the format in the source data. For more information about date and time formats, see Formats of date and time source data. Note The Input Format text box appears automatically when you select a Datetime data type. |
Save the Analytics data file
In the Save Data File As dialog box, enter a name for the Analytics data file and click Save.
If Analytics prefills a data file name, you can accept the prefilled name, or change it.
You can also navigate to a different folder to save the data file if you do not want to use the default location opened by Analytics.
Finalize the import
- In the Final page, verify the
settings for the new Analytics table and click Finish.
If you want to make any changes, click Back to get to the appropriate page in the wizard.
- Enter a name for the table layout that you are adding
to the project, or keep the default name, and click OK.
The new Analytics table is created with data from the imported file.
Import multiple Excel worksheets
In a single operation, import multiple Excel worksheets, or named ranges, from an Excel file, or from multiple Excel files. Once imported to an Analytics project, each worksheet or named range becomes a separate Analytics table.
Analytics automatically defines the source Excel data and no manual definition is possible during the import.
Once the data is in Analytics, you can make any necessary adjustments to the data definition in the Table Layout dialog box.
Note
Make sure all Excel files are closed before you begin the import process.
All first rows in the worksheets and named ranges that you import should use a consistent approach. First rows should be either field names, or data, across all data sets. Avoid mixing the two approaches in a single import operation.
If the data sets have an inconsistent approach to first rows, use two separate import operations.
Locate and select the Excel file or files
- Select Import > File.
- In the Select File to Define dialog box,
locate and select the Excel file or files and click Open.
Microsoft Excel files have an .xlsx or an .xls file extension.
You can Shift+click to select multiple adjacent files, or Ctrl+click to select multiple non-adjacent files.
- In the File Format page, verify that the Excel file option has been selected and click Next.
Specify the worksheets to import
- In the Data Source page, select the worksheets or the named ranges to import.
Note
To see any named ranges, deselect System Table Only.
Select individual worksheets or named ranges, or select the first checkbox if you want to select all the worksheets and named ranges in the Excel file or files.
Worksheets are identified with a dollar sign ($) appended to the worksheet name. The dollar sign is added temporarily, and does not appear in the resulting Analytics table name.
- Review the settings assigned by Analytics, make any required updates, and click Next.
Setting Description Table Name The name for the table in the Analytics project.
Keep the name assigned by Analytics, or double-click a table name, type a different name, and press Enter.
Note
The table name applies to both the new table layout and the new source data file created when importing the data.
Use first row as Field Names Values in the first row in each worksheet or named range are used as field names in the resulting table layouts.
Note
If you use this setting, the row used as field names is whatever line number is specified in Start On Line.
This setting applies globally to all worksheets and named ranges that you import.
Overwrite existing tables Existing tables with identical names in the Analytics project are overwritten.
For detailed information, see How overwriting works.
Start On Line The line number on which to start reading the worksheets.
This setting allows you to skip lines at the beginning of worksheets that contain information you do not want to import. For example, if the first three lines of each worksheet contain header information, enter 4 to start reading data on the fourth line.
Note
The start line for a named range is always the first line in the named range, regardless of the Start On Line setting.
Include File Name Prepend the Excel file name to the name of the Analytics table or tables.
Tip
If worksheets in different files have the same name, prepending the Excel file name allows you to avoid table name conflicts.
Import all fields as character type Assigns the Character data type to all the imported fields.
Tip
Assigning the Character data type to all the imported fields simplifies the process of importing Excel files.
Once the data is in Analytics, you can assign different data types, such as Numeric or Datetime, to the fields, and specify format details.
Import all fields as character type is useful if you are importing a table with identifier fields automatically assigned the Numeric data type by Analytics when in fact they should use the Character data type.
First 100 records Analytics uses only the first 100 records in the worksheet or named range to determine the data type of fields, and the length of fields, in the resulting Analytics tables.
With large Excel files, using First 100 records significantly speeds up the import process.
Caution
Use this option only if you are confident that values in the first 100 records accurately reflect the data type and length of all subsequent values.
If any values after the first 100 records are of a different data type, or are longer, the resulting Analytics table will contain inaccurate or truncated data.
Inaccurate or truncated data in critical fields will very likely invalidate the results of subsequent data analysis.
Entire Excel Worksheet or Named Range Analytics uses all the records in the worksheet or named range to determine the data type of fields, and the length of fields, in the resulting Analytics tables.
With large Excel files, using all the records to determine data type and field length significantly slows down the import process.
Note
Use this option if you are uncertain about the consistency of the data types or the length of values in worksheet columns.
Output Path Specifies the folder where the new Analytics data files (.fil) are saved.
If you leave Output Path blank, the Analytics data files are saved in the folder containing the Analytics project.
Finalize the import
In the Final page, verify the settings for the new Analytics tables and click Finish.
If you want to make any changes, click Back to get to the appropriate page in the wizard.
The new Analytics tables are created with data from the imported worksheets or named ranges.
Note
If a numeric suffix has been added to a Table Name in the Final page, a table with the same name already exists in the Analytics project and you have chosen not to overwrite existing tables.
For detailed information, see How overwriting works.