Testing a control
You can use Projects to easily and effectively organize all the tasks involved in testing a control. Within a project, you can specify the number of testing rounds, evaluate the design of the control, prepare a test plan, and evaluate control effectiveness.
Ultimately, the testing results in a project can roll up into your organization's Overall Assurance score, which gives you a real-time picture of how well your organization is mitigating risk.
Scenario
You are an Audit Manager that owns an entire IT General Controls Review (IA Context) project. Previously, you created a project from a project template. Now, you need to test one of the controls in the Physical Security objective to evaluate its design and operational effectiveness.
As you test the design and operational effectiveness of each control in the project, you want to be able to benchmark, in real-time, how well your organization is doing in mitigating risk. This information will come in handy when it comes time to prepare the final audit report.
Create a project
This tutorial walks you through the key areas in Projects that relate to the task of testing a control.
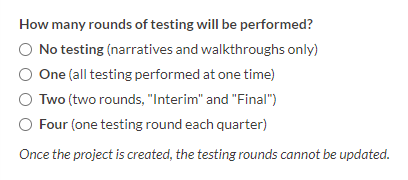
To start, create a project from a template. When you create a project, you must decide how many testing rounds the project will have.
- Ensure that you have the appropriate permissions to create a project.
-
From the Launchpad home page (www.diligentoneplatform.com), select the Projects app to open it.
If you are already in Diligent One, you can use the left-hand navigation menu to switch to the Projects app.
Note
Diligent One Platform also supports the domain www.highbond.com. For more information, see Supported domains.
- Begin creating a new project using the IT General Controls Review (IA Context) project template.
- Determine how many testing rounds you need to be performed in the project. In this case, select One, and click Rollforward:
 Note
NoteWhen you first create or rollforward a project, the number of testing rounds you choose becomes locked in. You can't change the number of testing rounds after saving the project.
Result You created your project with one testing round that will be used for verifying the operating effectiveness of the control. For each control you define in the project, a test plan, walkthrough, and single testing round is automatically created.
Enable assurance
Let's get started by setting up our project. The first step involves enabling assurance so that you can aggregate testing results for reporting purposes.
- Within the IT General Controls Review (IA Context) project, in the upper-right corner, click Settings.
- On the Settings subtab, enable Assurance.
Result You enabled assurance in the project. Now, testing results will be automatically aggregated in the project, allowing you to report on assurance in real-time.
Evaluate control design
Great, the project is all set up and ready to go. Now, you can begin the real work by performing a walkthrough to assess the design of the control.
Result You have evaluated the design of the control. The control walkthrough is defined as "passed".
Prepare the test plan
Now that you performed a walkthrough, you have a better understanding of how the control is designed to mitigate risk. Before you launch into testing the effectiveness of the control, you need to prepare a test plan that identifies how you will test the control.
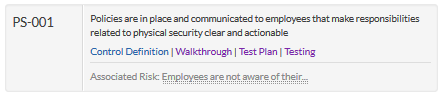
- Click Edit Plan beside PS-001, enter the following details, and click Save:
- Testing Method Inspection
Total Sample Size 1
NoteTotal Sample Size is automatically set when the test plan is generated the first time, which occurs when you create a control. Total Sample Size is based on two control attribute fields: Frequency and Type.
Test Steps / Test Attributes
- Obtain a copy of the organization's physical security policy document.
- Evaluate documentation for the following:
- Coverage of critical pieces of the organization's plans and procedures
- Documentation of incidents
Result You have defined the testing method, the total sample size (split amongst testing rounds), and test steps that need to be performed to test the control.
Evaluate control effectiveness
Since you documented the testing method and steps in your test plan, you know how you are going to test the control. The final step is to perform the test to evaluate the operational effectiveness of the control.
- From the Test Plan page, click the Testing link.
Result You have evaluated the operational effectiveness of the control. The control test is defined as "passed".
Discussion
Now that you have tested a control, learn about the next steps you can take, and see how testing a control relates to assurance.
What's next?
To corroborate the statements in your results, you can add supporting documentation to walkthroughs and tests by uploading files or linking evidence from the Results app.
In this scenario, both the control walkthrough and the control test passed. If either the control walkthrough or control test failed, you could note exceptions by logging issues. You can log an issue by clicking Add Issue in the Issues panel.
To learn more about logging issues, see Recording issues.
Take a course in Academy
Continue to build your knowledge on the concepts introduced in this tutorial by taking an Academy course.
For more information, see Course Catalog.
Automating control assessments
Performing control assessments can be a time-consuming and manual process. To increase efficiency, you can create assessment drivers to automate control assessments - which allows you to react more quickly to change, and deliver information to the right person at the right time.
For more information, see Automating control assessments.
What's the bigger picture?
Previously, you enabled a setting called Assurance. This setting allows you to display an overall assurance value (represented by a percentage) in the project for reporting purposes. Assurance allows you to benchmark how well your organization is doing in mitigating risk.
As you perform walkthroughs and tests, Projects automatically aggregates testing results and issues from active projects, and calculates assurance in real-time.
To learn more about how assurance works, see Getting started with assurance for risk.
Calculating assurance in real-time
In the IT General Controls Review (IA Context) project, you click the Results tab and notice that the Overall Assurance is 2%.
This means very few of your organization's controls are effectively mitigating risk - in fact, at the moment, only the control that you tested is operating effectively:
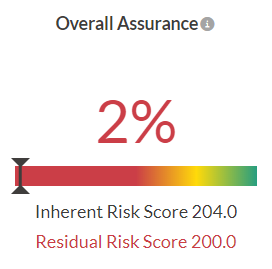
As walkthroughs and tests pass, assurance increases. Any walkthroughs and tests that fail, or are not tested, are considered "failed", and decrease the assurance score.