Scheduling control performance
Create a schedule to assure that control activities are being performed consistently.
Before you start
Before you can create a schedule, you must define controls within a project.
How it works
You can evaluate how a control is performing by sending Results questionnaires to control performers on a specified schedule, and aggregating responses for analysis.
First, you enable control performance in the project, which automatically creates a collection in Results. Then, you manage users and create questionnaires within the Results collection. Finally, in the Projects app, you define a schedule for sending questionnaires to control performers.
Terms and definitions
- Control performance the assurance that control activities are being performed consistently
- Control performers the frontline staff that need to perform control activities consistently
- Schedule the plan that specifies when control activities should be performed
- Control Tasks the occurrences of control activities previously performed and currently being performed
Control performance data
Each project with enabled control performance has a corresponding Collection that contains an Analysis and Table in Results:
- Collection name is the same as the project name
- Analysis "Control Performance" (editable)
- Table "Control Tasks" (editable)
This table contains all scheduled performance records for the project. As more schedules are added to controls in the project, records are appended to the table in Results.
For more information, see Recording control performance.
Note
If you have certifications enabled in the project, a corresponding collection already exists in Results. In this case, a separate Analysis and Table is created within the existing collection.
Disabling control performance or archiving or deleting projects
If you disable control performance, or archive or delete a project (temporarily or permanently), questionnaire links expire, and any previously created control performance schedules stop running. The collection is archived in Results.
Unarchiving or restoring deleted projects
If you unarchive a project or restore a deleted project that has control performance enabled, the collection in Results is also unarchived. Enabled schedules begin running on the specified frequency.
Checked out sections
If you check out a section using Diligent One for iPad or Offline Projects, control performance schedules stop running. Once you check in the section, the schedules start running again.
Rollforward projects
When you rollforward a project, control performance schedules are copied to the new project. A new collection is automatically created in Results containing all collection members and previously created questionnaires. The analysis name and description are also copied to the new analysis within the new collection. The new project and the new collection are automatically linked and enabled schedules begin running on the specified frequency.
Deleting schedules
If you delete a schedule, the schedule is permanently removed from the Projects app and all outstanding questionnaire links expire. The table containing questionnaire response information is retained in Results.
Example
Weekly Accounts Payable
Scenario
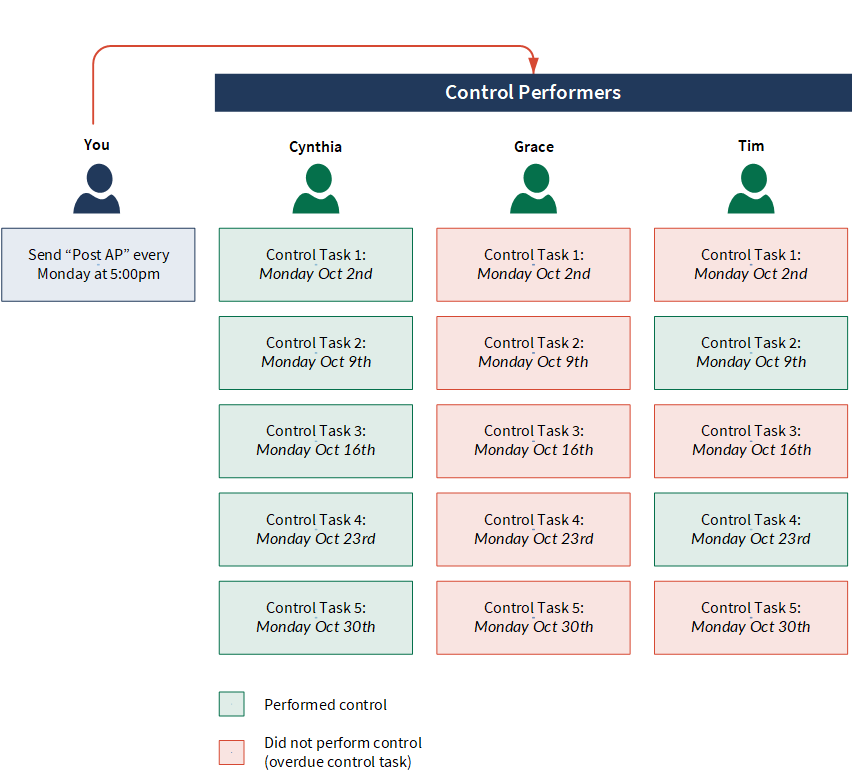
You are a process owner that needs to ensure that the accountants in your organization are posting Accounts Payable on a weekly basis.
Process
You create a questionnaire in Results called "Post AP". In the Projects app, you assign three control performers (Cynthia, Grace, and Tim), and schedule the questionnaire to be sent to them every Monday at 5:00pm Pacific Standard Time (PST):

Result
At the end of the month, Audit reviews the aggregated responses from Cynthia, Grace, and Tim. Audit also reviews the total number of overdue control tasks: 
Audit notices that Cynthia performed the control consistently, Grace never performed the control, and Tim performed the control less than half of the time. This evidence will help to inform testing, and may suggest that the control is not operating effectively.
Permissions
 = Full read and write access
- *= Read and write access if owner or executive owner of an objective or owner of at least one control in the objective. Otherwise, Read-only access.
-
 = Read-only access
 = No access
| Role | Enable | Schedule |
|---|---|---|
| Professional Manager |
|
|
| Professional User |
|
|
| Oversight Executive |
|
|
| Oversight Reviewer |
|
|
| Contributor Manager |
|
|
| Contributor Tester |
|
|
| Contributor User |
|
|
| No Access |
|
|
Control tasks can be assigned to anyone, including non-licensed users, enabling ease of responding to self-assessment requests.
Enable control performance
Enable control performance in a project to begin creating schedules.
-
From the Platform home home page (www.diligentoneplatform.com), select the Projects app to open it.
If you are already in Diligent One, you can use the left-hand navigation menu to switch to the Projects app.
Note
Diligent One Platform also supports the domain www.highbond.com. For more information, see Supported domains.
- Open a project.
The project dashboard opens.
- Click the Settings project management tab.
The Settings subtab opens.
- Next to Control Performance, select Enable.
- Click Save.
Result Control performance is enabled in the project. A new Results collection is automatically created with the same name as the project. You can click on the collection link to assign users access to the collection and create questionnaires.
Create and manage a single schedule
Define a schedule for sending questionnaires to control performers to assure that control activities are being performed consistently.
Navigate to the Execute Procedure or Walkthrough page
Note
- Interface terms are customizable, and fields and tabs are configurable. In your Diligent One organization, some terms, fields, and tabs may be different.
- If a required field is left blank, you will see a warning message: This field is required. Some custom fields may have default values.
- Click the Fieldwork tab.
- Click Go To next to the appropriate objective, and select Execute Procedures or Walkthroughs.
- Click View / Edit next to the procedure or walkthrough.
Result The Execute Procedure or Walkthrough page opens.
Specify the questionnaire to send to control performers
- On the Execute Procedure or Walkthrough page, scroll down to the Supporting Files section, and under Control Performance, click New Schedule.
The Schedule side panel displays.
- Choose the Results questionnaire you want to send to control performers:
- Optional. Search for a questionnaire by name.
- Optional. Click view beside a questionnaire to view it in Results.
- Click the radio button next to the questionnaire you want to send and click Save and Continue.
Define the schedule
- In the Title field, provide a name for the schedule.
The maximum character limit is 255.
- In the Performers field, do any of the following:
- To specify a person that is not a licensed user, enter the email address of the person, and hit Enter on your keyboard.
Note
Diligent One Platform does not support email addresses with accents or non-Latin characters.
- To specify a person that is a licensed user, begin typing the name of the person, and select the person from the list.
- To specify a person that is not a licensed user, enter the email address of the person, and hit Enter on your keyboard.
- Optional. In the Procedure field, specify the steps for performing the control.
- Schedule when control performers should receive the questionnaire, and click Save and Continue:
- To send the questionnaire once you save the schedule, select Send the questionnaire immediately.
- To specify how often the questionnaire should be sent, define the frequency.Note
The default Frequency value correlates to the Frequency value specified in the control's attributes.
- Optional. Disable
 the schedule if you do not want to send out the questionnaires on the specified frequency just yet, or if you want to stop the schedule temporarily.
Result The schedule is defined.
Review and save the schedule
- Review the schedule you have defined.
- Optional. Disable the schedule if you do not want to send out the questionnaires on the specified frequency just yet, or if you want to stop the schedule temporarily.
- Optional. Click Edit next to the appropriate section to make any updates.
- From the Review step, click Save.
Result The schedule is setup.
Control performers receive a questionnaire on the specified schedule, and responses are aggregated and displayed on the Execute Procedure or Walkthrough page. A corresponding Results analysis and table are automatically created within the collection to store responses.
Manage a schedule and view responses
- Navigate to the Execute Procedure or Walkthrough page in the project, and scroll down to the Control Performance section under Supporting Files.
- Do any of the following:
- Filter control tasks click the Control Task label, and select the appropriate values.
To show all control tasks, click Reset.
Status information is summarized in the bar chart and displayed in detail in the table.
- Not Started questionnaire sent but no response has been received
- In Progress questionnaire sent and responses have been saved but not submitted
- Complete questionnaire sent and responses have been submitted
- View details about control tasks that are overdue click the Control Task label and enable Show Overdue Only
 .Note
.NoteOverdue control tasks are the number of times control activities have not been performed on schedule. An overdue control task displays when a control performer receives a subsequent questionnaire and has not submitted a response to a previously sent questionnaire.
- Resend a questionnaire to a specific control performer click the Control Task label, click resend and click Yes.
- View responses to a completed questionnaire click the Control Task label, and click the name of the appropriate schedule.
- Update a schedule click the Schedule label and click New Schedule to create a new schedule or click the Schedule name link to update an existing schedule.
- Respond to a questionnaire you have been assigned click the Control Task label, click respond or click the questionnaire link in the email notification.
- Delete a schedule click the Schedule label, click the trash can
 beside the appropriate schedule, and click Delete.
- Filter control tasks click the Control Task label, and select the appropriate values.