Creating and managing a robot
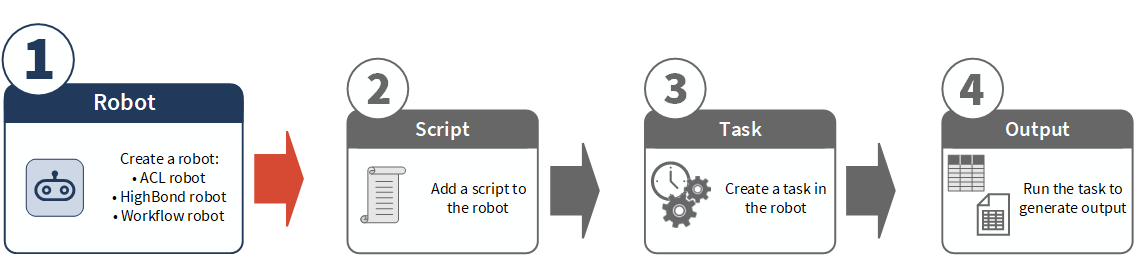
Creating a robot is the first thing that you need to do when building an automation structure in Robots. A robot is a container that holds the scripts, tasks, and associated tables and files that together enable automation.
You can organize a collection of robots by storing them in folders. For more information, see Creating and managing a robot folder.
Robot types
You can choose between three different types of robots. One type of robot is not better than another. Each type has a different purpose, and you choose the one that best matches your needs in terms of purpose and scripting language.
For detailed information about the differences between robot types, see Python and HCL scripting in Robots.
| Robot type | Purpose | Scripting language | Considerations |
|---|---|---|---|
| ACL robot |
Full-scale data analysis with scripts that you upload from Analytics, and scheduled tasks. |
ACLScript |
Scripts can run in the cloud, or on-premise. On-premise scripts can access cloud or on-premise data. |
| HighBond robot |
Full-scale data analysis with Python/HCL scripts created directly in the robot, and scheduled tasks. |
Python/HighBond Command Language (HCL) |
Scripts can run in the cloud only. Scripts can access cloud-based data sources but they cannot directly access on-premise data. |
| Workflow robot |
Diligent One workflow automation, or light data analysis, with Python/HCL scripts created directly in the robot, and scheduled or event-based tasks. Note To access Workflow robots, you must be assigned the System Admin user type with a Professional subscription. The intention is that a System Admin with a Professional subscription will be able to configure tasks in Workflow robots that are triggered by Diligent One events. This functionality is still being developed and not yet available. |
Python/HighBond Command Language (HCL) |
Scripts can run in the cloud only. Scripts can access cloud-based data sources but they cannot directly access on-premise data. |
Performing actions on robots
The robots that you have permission to work with appear on the dashboard in Robots. You can create, edit, or delete a robot, or manage collaborators for a robot, as required. Your assigned role for each robot controls which of these actions you can perform on the robot.
For information about robot roles and permitted actions, see Robot and robot folder access.
Naming robots
On the dashboard in Robots, individual robots appear below any robot folders. The default sort order for robots is alphabetical by name. A consistent naming convention helps organize the collection of robots. For example:
- Using a prefix with each robot name allows you to easily insert future robots at appropriate points in the sort order. For example: A_01, A_02, B_01, B_02, and so on.
- Using the prefix xxx_ with less frequently accessed robots positions them lower in the sort order.
- Using the prefix zzz_ with robots that are not currently used positions them at the bottom of the sort order.
Create a robot
You can create a robot on the Robots dashboard, or in a folder. Where you create a robot has implications for the robot collaborators initially designated for the robot.
To create a robot in a folder, you must be an owner of the folder.
- Create a robot on the dashboard When you create the robot, you automatically become an owner of the robot. Any Robots Admins also automatically become owners. No other collaborators are initially designated for the robot. As an owner of the robot, you can add additional collaborators, as required.
- Create a robot in a folder When you create the robot, you automatically become an owner of the robot. Any Robots Admins also automatically become owners. In addition, any other collaborators specified at the folder level cascade to the new robot and become collaborators for the robot. As an owner of the folder, you can add or remove non-administrator collaborators at the folder level, as required.
Caution
Keep in mind that any changes you make at the folder level to collaborators cascade to all robots in the folder. Before making a change, make sure that the change is appropriate for all robots in the folder.
For more information about robot and folder collaborators, see Robots app permissions.
-
From the Platform home page (www.diligentoneplatform.com), select the Robots app to open it.
If you are already in Diligent One, you can use the left-hand navigation menu to switch to the Robots app.
Note
Diligent One Platform also supports the domain www.highbond.com. For more information, see Supported domains.
- From the dashboard in Robots, select the tab for the type of robot that you want to create:
- ACL Robots
- HighBond Robots
- Workflow Robots
Workflow Robots only appears if you are a System Admin with a Professional subscription.
-
If you want to create the robot in a folder, click the folder to open it.
- Click + Create for your chosen robot type.
- Select an icon and enter a name for the robot.
Tip
You can use icons to organize robots into easily identifiable groups.
Note
Do not use currency symbols anywhere in the robot name, for example: $ , € .
- Optional. In the Description field, describe the robot so that other users understand what the robot does.
- Click Create for your chosen robot type.
The robot is created and added to the dashboard or the folder.
Note
If the message Cannot create robot appears, you need to specify a different name for the robot. Another robot with the same name already exists.
If you are not a collaborator with permissions for the existing robot, the robot is not visible to you.
If you created a HighBond robot or a Workflow robot, the Robots script editor begins the start-up process as soon as you click Create.
If you are not ready to begin developing a Python/HCL script for the robot you can cancel the start-up process. In the upper-left corner of the script editor, click Robots, and then click Don't commit. You are returned to the dashboard.
Edit a robot
-
From the Platform home page (www.diligentoneplatform.com), select the Robots app to open it.
If you are already in Diligent One, you can use the left-hand navigation menu to switch to the Robots app.
Note
Diligent One Platform also supports the domain www.highbond.com. For more information, see Supported domains.
- From the dashboard in Robots, select the tab for the appropriate robot type.
- Locate the robot that you want to edit and click
 in the upper-right corner of the robot.
 - Click Edit details.
- Update any of the icon, name, or description fields and click Save changes.
Note
If the message Cannot update robot appears, you need to specify a different name for the robot. Another robot with the same name already exists.
If you are not a collaborator with permissions for the existing robot, the robot is not visible to you.
Delete a robot
Caution
Once you confirm the deletion of a robot, the deletion of any content contained in the robot is permanent. You cannot recover any of the deleted content.
When you delete a robot, you delete all the content contained in the robot, in both development mode and production mode:
- all script versions
- configured tasks
- task run history
- all result and working data – tables, files, and logs
Note
To delete a robot, you must be an owner of the robot.
-
From the Platform home page (www.diligentoneplatform.com), select the Robots app to open it.
If you are already in Diligent One, you can use the left-hand navigation menu to switch to the Robots app.
Note
Diligent One Platform also supports the domain www.highbond.com. For more information, see Supported domains.
- From the dashboard in Robots, select the tab for the appropriate robot type.
- Locate the robot that you want to delete and click in the upper-right corner of the robot.
- Click Delete robot > Delete.
Result the robot is deleted and any content the robot contains is also deleted.
- If the Deleting... indicator continues to display, manually reload the page.
Manage collaborators for a robot
Note
To manage collaborators for a robot, you must be an owner of the robot, or the robot folder.
Robots Admins are automatically a collaborator for every robot and folder, with the role of owner. This automatic assignment cannot be changed from inside a robot or folder.
Collaborators are Diligent One users with permission to access a particular robot. If a user has not been added as a collaborator for a robot, the robot is invisible to the user.
The activities that a collaborator can perform in a robot depend on their assigned robot role:
-
An Owner can control the robot and manage other robot collaborators.
-
An Editor can maintain aspects of the robot and the tasks it contains.
-
A Reviewer can run tasks and view task results.
For detailed information about robot roles and associated robot permissions, see Robots app permissions.
Robot owners can manage collaborators for ACL robots and HighBond robots. Because access to Workflow robots is restricted to the System Admin user type with a Professional subscription, the list of collaborators is read-only.
If a robot is not contained in a folder, manage collaborators at the robot level. For robots that are contained in a folder, manage collaborators at the folder level. The specified collaborators automatically cascade to every robot in the folder.
Manage collaborators at the robot level
Note
You cannot manage collaborators at the robot level if the robot is in a folder.
-
From the Platform home page (www.diligentoneplatform.com), select the Robots app to open it.
If you are already in Diligent One, you can use the left-hand navigation menu to switch to the Robots app.
Note
Diligent One Platform also supports the domain www.highbond.com. For more information, see Supported domains.
- From the dashboard in Robots, select the tab for the appropriate robot type.
- Navigate to the robot that you want to manage collaborators for, and select the robot to open it.
- In the side panel, under Robot details, click Add collaborators or Manage.
The Collaborators side panel opens.
- To manage the collaborators, do any of the following:
- Add to add a user to the robot, click Add collaborators and select the user.
By default, the user is added as a Reviewer. If necessary, update the user's role.
- Update to change a user's role, select a new role from the dropdown list beside the user's name.
- Remove to remove a user, click the X next to the dropdown list.
Tip
Use the search bar to filter the names in the list.
- Add to add a user to the robot, click Add collaborators and select the user.
- When you are finished, click the X in the upper-right corner of the Collaborators side panel.
Manage collaborators at the folder level
-
From the Platform home page (www.diligentoneplatform.com), select the Robots app to open it.
If you are already in Diligent One, you can use the left-hand navigation menu to switch to the Robots app.
Note
Diligent One Platform also supports the domain www.highbond.com. For more information, see Supported domains.
- From the dashboard in Robots, select the tab for the appropriate robot type.
- Click the robot folder that you want to manage collaborators for.
- In the side panel, under Folder details, click Add collaborators or Manage.
The Collaborators side panel opens.
- To manage the collaborators, do any of the following:
- Add to add a user to the folder, click Add collaborators and select the user.
By default, the user is added as a Reviewer. If necessary, update the user's role.
- Update to change a user's role, select a new role from the dropdown list beside the user's name.
- Remove to remove a user, click the X next to the dropdown list.
Tip
Use the search bar to filter the names in the list.
- Add to add a user to the folder, click Add collaborators and select the user.
- When you are finished, click the X in the upper-right corner of the Collaborators side panel.