Concept Information
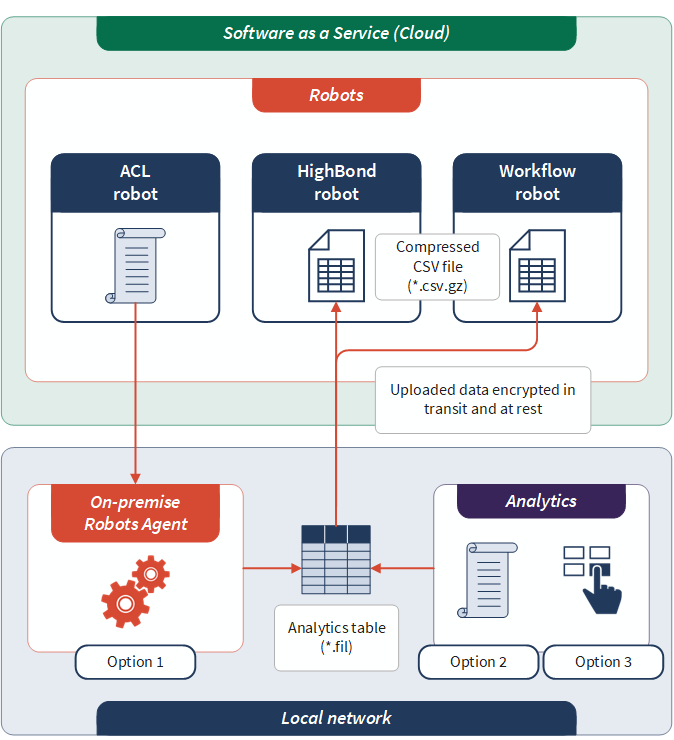
If you use the Robots app in HighBond, you can export (upload) the data in a local Analytics table to a compressed CSV file (*.csv.gz) in Robots. You can export to the Working data tab in either a HighBond robot or a Workflow robot, where you can use Python/HCL scripting to analyze or process the data. You cannot export to an ACL robot.
For organizations that use ACL scripts and an on-premise Robots Agent, this capability allows you to build integrated ACLScript-Python/HCL data automation workflows that move data from your local network to your cloud-based Robots instance.
For more information about how to access the compressed CSV file after exporting it to Robots, see load_working_file() method. For an overview of the Robots app, see Automating work with Robots.
Note
Data uploaded to Robots is stored in secured AWS data centers and is encrypted in transit and at rest. For more information, see Diligent Trust Center.
Automate the process with a script or export manually
You can script the process of exporting local Analytics data to Robots. You can also manually export the data using the Analytics user interface.
-
Option 1 Upload (commit) a script to an ACL robot in Robots and run the script using your on-premise Robots Agent.
-
Option 2 Run a script locally in Analytics.
-
Option 3 Manually export the data using the Analytics user interface. You use the standard procedure for manually exporting data from Analytics, with some minor differences.
For more information about automating the process with a script, see EXPORT command.
Security requirements
The ability to upload a compressed CSV file to the Robots app requires a specific robot role assignment, or administrative privileges:
-
Users with an Editor or Owner role for a robot can upload a compressed CSV file to the robot. Users with a Reviewer role cannot upload.
-
Robots Admins are automatically a collaborator for every robot, with the role of Owner.
-
A HighBond System Admin with a Professional subscription is automatically a Robots Admin.
For more information, see Robots app permissions.
Manually export data to Robots
Note
You may be required to specify a password when you connect to HighBond. For more information, see Password requirement.
Specify the fields to export
- Open the table with the data that you want to export.
- Select Data > Export.
- On the Main tab, select one of the
following:
- Fields specify which fields you want to export
When you select this option, the fields are exported using the physical field names in the table layout.
For information about renaming fields, see Rename a field in a table layout.
- View export all fields
in the current view
When you select this option, the fields are exported using the column display names. The fields are exported in the same order as they appear in the view.
For information about renaming columns, see Rename columns in a view.
- Fields specify which fields you want to export
- If you chose Fields, do one of
the following:
- Select the field(s) to export from the Export
Fields list.
Tip
You can Ctrl+click to select multiple non-adjacent fields, and Shift+click to select multiple adjacent fields.
- Click Export Fields to select the field(s), or to create an expression.
Note
Fields are exported in the order that you select them.
- Select the field(s) to export from the Export
Fields list.
Select the export options
- In the Export As dropdown list, select Robots.
- Optional. Select Overwrite if you want to replace an existing file with the same name in the destination robot.
Note
Appending data to an existing *.csv.gz file is not supported. If Overwrite is deselected and a file with the same name already exists in the destination robot, the export fails with an error.
Finalize the export
-
If there are records in the current view that you want to exclude from processing, enter a condition in the If text box, or click If to create an IF statement using the Expression Builder.
Note
The If condition is evaluated against only the records remaining in a table after any scope options have been applied (First, Next, While).
The IF statement considers all records in the view and filters out those that do not meet the specified condition.
-
Click To, and in the Select Destination dialog box navigate to the appropriate robot.
Robots are listed in alphabetical order, with HighBond robots listed first, followed by Workflow robots.
-
Select the robot.
When you select a robot, a notification beneath the list of robots includes the robot type.
-
Under Environment, select either Development or Production to specify which robot mode the file is exported to.
- Click OK.
You are returned to the Export dialog box and the HighBond API URL for the destination robot is prefilled in the To text box.
- Click the More tab.
-
In the Scope panel, select the appropriate option:
- All
- First
- Next
- While
 Show me more
Scope option Details All (Default) Specifies that all records in the view are processed. First Enter a number in the text box. Starts processing at the first record in the view and includes only the specified number of records. Next Enter a number in the text box. Starts processing at the currently selected record in the view and includes only the specified number of records. The actual record number must be selected in the leftmost column in the view, not data in the row. While Use a WHILE statement to limit the processing of records in the view based on a particular criterion or set of criteria.
Enter a condition in the While text box, or click While to create a WHILE statement using the Expression Builder.
A WHILE statement allows records in the view to be processed only while the specified condition evaluates to true. As soon as the condition evaluates to false, the processing terminates, and no further records are considered.
You can use the While option in conjunction with the All, First, or Next options. Record processing stops as soon as one limit is reached.
Note
The First or Next options reference either the physical order or the indexed order of records in a table. First or Next disregard any filtering or quick sorting applied to a table view. However, output results of analytical operations respect any filtering.
If a view is quick sorted, Next behaves like First.
- Click OK.
A progress indicator appears while the data is exported to Robots. When the export operation is complete, an entry is created in the log.
If the data export was successful, a file with the name <Analytics table name>.csv.gz appears in the Working data tab in the destination robot.
Password requirement
Password required
You need to specify a password to export to Robots in either of these situations:
-
you use a script to export to Robots, and you run the script in Robots
-
you used offline activation to activate your copy of Analytics
The required password value is a HighBond access token.
Password not required
You do not need to specify a password to export to Robots if you used online activation to activate your copy of Analytics. The password is automatically created and sent to Robots based on activation information stored on your computer.
Acquire a HighBond access token
Caution
Safeguard your access token like any account password. It contains information unique to your HighBond account. You should not share access tokens.
Use an existing access token unless you have a reason for creating a new one. If the existing token does not work, create a new one. Using an existing token cuts down on the number of tokens you need to manage.
-
Do one of the following:
-
From the Analytics main menu, select Tools > HighBond Access Token.
-
In the Script Editor, right-click and select Insert > HighBond Token.
The Manage API tokens page opens in your browser. You may be required to first sign in to HighBond.
Access to the Manage API tokens page through Analytics is a convenience feature. You can also sign in to HighBond and access the page through your user profile without using Analytics.
-
-
Do one of the following:
-
Use an existing token
-
In the Token column, click the partially masked token that you want to use.
-
Enter your HighBond account password and click Confirm.
The unmasked token is displayed.
-
Click Copy to copy the token.
Tip
Do not close the dialog box containing the token until you have successfully pasted the token.
-
-
Create a new token
-
Click Add token > Analytics.
-
In the New Analytics token side panel, specify the following information:
Field or option Description Description Enter a description that provides useful information, such as:
- The purpose of the token
- Where the token is used – for example, the name and location of the Analytics script, or the name and location of the robot task
Token expiry - Enabled the token expires after the number of days that you specify
- Disabled the token never expires
Note
Your organization may have a security policy that requires tokens to expire after a certain amount of time. Creating tokens with an expiry is a good practice. HighBond sends you an automated email notification in advance of the expiry date.
Expires in Specify the number of days before the token expires (1 to 365). Password Enter your HighBond account password. -
Click Generate token.
-
Click Copy to copy the token.
Tip
Do not close the side panel containing the token until you have successfully pasted the token.
-
-
-
Depending on which data access and password definition method you are using, do one of the following:
Analytics user interface
Paste the copied token into a password prompt that appears when accessing HighBond manually.
Analytics script
-
PASSWORD command Paste the copied token into a password prompt that appears during script execution.
-
SET PASSWORD command Paste the copied token at the appropriate point in the SET PASSWORD command syntax in a script.
-
-
In Launchpad, close the dialog box or the side panel containing the token.
If you created a new token, a partially masked version of the token is added to the top of your list of tokens.
For more information, see Creating and managing HighBond access tokens.