Bulk uploading issues
Bulk upload issues to a project if you need to avoid time-consuming manual data entry or migrate data from another system.
Bulk uploaded issues do not display as part of assurance in Strategy and assurance in Projects.
Note
You can bulk upload risks, controls, and issues using one of the two options below.
- From the Projects or Frameworks apps This is an old way of doing things, but it has limited functionality. You can only upload a few resources, which include risks, controls, and issues. Also, you cannot update resources with this option. Continue with this topic if you are happy with the old approach.
- From Launchpad This is our recommended approach. You can upload more resources and you can also update resources with this option. For more information, see Bulk importing Diligent One resources using Launchpad.
How it works
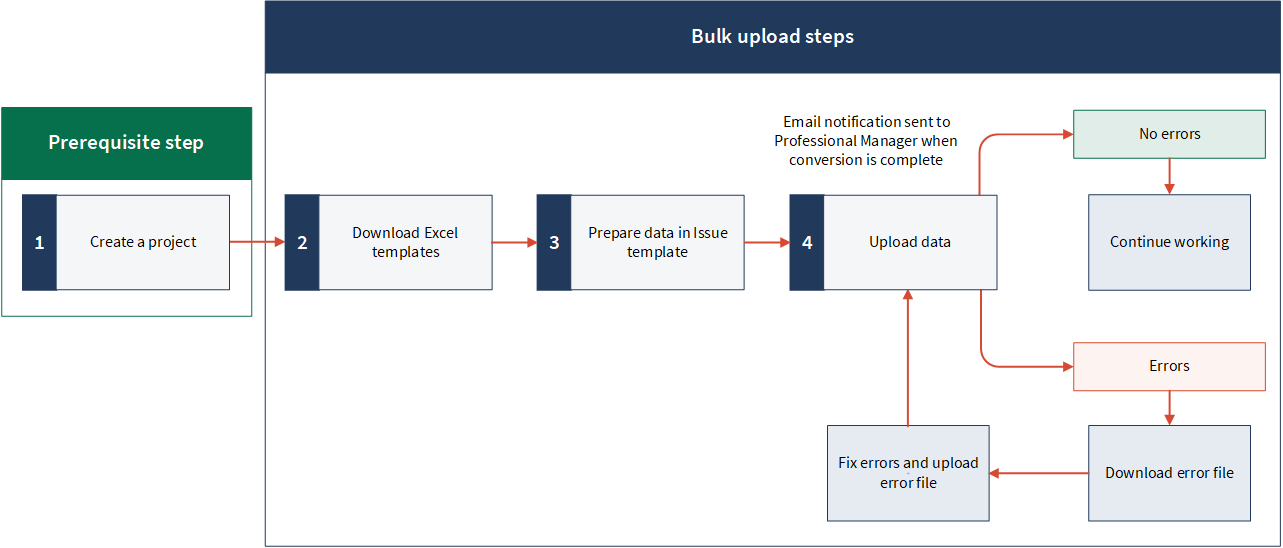
You download the Issue template from the Projects app and prepare data in the template. Then, you upload the template to the Projects app. You can bulk upload issues to projects associated with either a Workplan or an Internal Control workflow.
Where are the uploaded issues?
Once you upload issues, the data is available in:
- the Issues tab
- Issue Tracker
- OrganizationName Project Report (the final audit report)
- all of the downloadable Issues reports
Limitations and considerations
- Bulk updating issues is not supported.
- When you bulk upload issues and specify a Diligent One user's email in an owner field (Owner, Executive Owner, Project Owner), the person is automatically assigned the issue in the Projects app. However, the person does not receive an email notification about the issue assignment.
- If you specify a user name or email address that does not belong to a Diligent One user, only the person's name or email displays in the owner field in the Projects app. The person is not automatically assigned the issue and notified via email.
Before you start
Before you can download the Issue template, you must create a project.
For more information, see Creating projects.
Workflow
Permissions
Only Professional Managers can bulk upload issues to a project.
Steps
Note
- Interface terms are customizable, and fields and tabs are configurable. In your instance of Diligent One, some terms, fields, and tabs may be different.
- If a required field is left blank, you will see a warning message: This field is required. Some custom fields may have default values.
Download Excel templates
-
From the Launchpad home page (www.diligentoneplatform.com), select the Projects app to open it.
If you are already in Diligent One, you can use the left-hand navigation menu to switch to the Projects app.
Note
Diligent One Platform also supports the domain www.highbond.com. For more information, see Supported domains.
The Projects home page opens.
- Open a project.
The project dashboard opens.
- Click the Settings project management tab.
- Click the Bulk Upload subtab.
The Bulk Upload page opens.
- Click Download .xlsx Template.
The Excel templates save to your local machine as a zip file (templates.zip).
- Extract the Excel templates from the zip file.
The extracted files are Risk_template.xlsx, Control_template.xlsx, and Issue_template.xlsx. If you have not created any objectives in the project, only the Issue_template.xlsx is available.
Prepare data in Issue template
- Open Issue_template.xlsx.
- Copy and paste or enter your data into the Issue template.
- Required fields are marked with an asterisk.
- To properly display decimal integers in the Issue ID field in the Projects app, add a single quotation ' in front of the decimal integers in Excel.
For information on specific fields in the Issue template, see Recording issues.
NoteThe maximum number of records that can be contained in the Issue template and uploaded to the Projects app is 1000. Data should only be entered in the single worksheet available in the Issue template. Additional worksheets are not processed.
- Save the Issue template.
Upload data
- Do one of the following:
- Optional. Skip duplicates Select this option to avoid uploading duplicate issues.
By default, this option is selected.
NoteYou must specify a value in the Issue ID field in the Issue template to avoid uploading duplicate issues.
- Click Upload.
An email notification is sent to confirm the completion. The email notification contains a link to the Bulk Upload page, where you can view the number of successfully processed records, as well as any that may have failed.
Once the Issue template is uploaded, the Projects app retains the formatting for rich text fields.
- If one or more issues were not added to the project, complete the following steps:
- On the Bulk Upload page, click Download Errors.
- Make corrections to the issues in the Error file.
- Upload the Error file to the Bulk Upload page.
Troubleshooting
Understand common bulk upload errors and causes and learn how to fix errors.
Can I undo a bulk upload?
There is no undo option available. However, if you detect any issues that were not uploaded correctly, you can perform the following steps:
- Remove the issues in the Projects app that you found errors with.
- In the template, update the issues that you found errors with.
Make sure to specify values in the Issue ID field in the template to avoid uploading duplicate issues.
- Upload the template again to the Projects app and select Skip duplicates.
Result The corrected issues are appended below the existing issues in the Projects app. To achieve a desired order of issues, you may need to manually reorder them in the Projects app.
Error file
If there are errors in the Issue template, the Projects app rejects the Issue template and generates an error file that contains:
- a list of issues that were successfully processed
- a list of issues that failed
- the reason why each record failed (identified in the Error field)
- the value in each field that caused the error to occur
The user that performed the bulk upload can download the error file (if applicable), make corrections to error file(s), and upload the error file(s) processing.
Uploading the error file appends the corrected records below the existing records in the Projects app. To achieve a desired order of Issues, you need to manually reorder Issues in the Projects app after uploading the error file.
If any of the fields in a record are in error, no other fields in the record are processed.
Errors
The table below provides a list of possible errors that may occur when uploading the Issue template. If a record has multiple errors, the error messages are concatenated together and separated by a comma within the Error field.
| Error | Description | Solution(s) |
|---|---|---|
| There are more than 1000 records in the uploaded file. Please reduce the number of records and try again. |
Occurs when you attempt to upload an Issue template with over 1000 records. |
Remove records from the Issue template and re-upload the Issue template to the Projects app. |
| Mandatory fields are missing in the Issue template | Occurs when you do not complete the mandatory fields in the Issue template. | Ensure that all mandatory fields (marked with an asterisk in the Issue template) are completed. Note If you do not provide data in the mandatory fields, the record is not processed. |
| Data format is incorrect | Occurs when the data exceeds the maximum field length or uploads an invalid format of data. |
Ensure that data in text fields does not exceed the maximum field length: 255 characters. Rich text fields do not have a character limit. |
| Data values do not match dropdown values | Occurs when you attempt to upload invalid values for dropdown fields. |
The values for Published?, Issue Type, Severity, Scope, Escalation Level, Overall Status, Remediation Status, and Custom Issue attributes must be available from the dropdown lists, as defined within the project type. |
| Field does not exist | Occurs when you add new fields to the Issue template or rename fields. |
|
| Template is not in expected format | Occurs when the project type has been altered after downloading the Issue template or if the Issue template has been changed to an unsupported format (i.e. .xls or .csv). |
|
| Error in Excel template states Number stored as text for the Issue ID field. | Occurs when you specify a decimal integer in the Issue ID field. |
Do one of the following:
|