Filtering table data
Use filters to define precise data sets that are displayed in the table you are working with. As you work with filters, any associated visualizations or metrics update to reflect the filtered data.
Combining filters
You can apply more than one filter to a table to display a specific subset of records. When you add more than one filter, the table displays records that match all filters that you apply. In other words, the filters are joined using AND logic to decide which records to include.
Note
If you add more than one filter for the same field, you can combine the filters using OR logic. Only filters applied to the same field support OR logic.
Example
You are working with a table of customer data and you want to only look at customers in New York with a credit limit exceeding $50,000. To filter the table so that only these customers are displayed, you create the following filters:
- STATE = NY
- LIMIT > 50000
The filters work together and include only those records where the state is New York and the limit is greater than 50000.
Apply a preset filter
- Open the Results app.
- Navigate to the appropriate table.
- To open the filter dialog box, on the right-hand side of the screen, click Filters
 and select one or both of the following:
- Assigned to Me displays all records assigned to you or a workflow group you belong to
- Status is Open displays all records in the Open status category
Create a filter
- Open the Results app.
- Navigate to the appropriate table.
- To open the filter dialog box, on the right-hand side of the screen, click Filters , click + Add Filter, and then select the column to filter.
You can enter a keyword or phrase into the Search field to filter the list of available columns.
Tip
You can also access the filter dialog box by clicking the heading of the column you want to filter.
- In the Filter section, do one of the following:
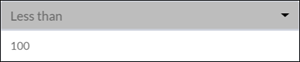
- From the Select Condition list, select a conditional operator to use and then enter the value to test against.
- To include only those records with values equal to a specific value or set of values, select one or more values below the Filter section.
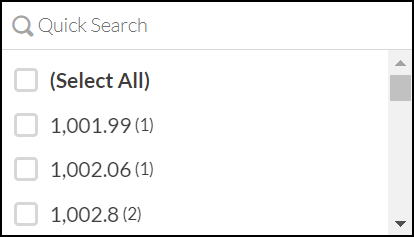
The list displays the first 200 values in sorted order and shows their frequencies in parenthesis. To restrict the list, or to view values beyond the first 200, enter a term in the Quick Search field. The search is progressive and case-insensitive.
Tip
Use the Select All option to select or clear all the values in one click.
- From the Select Condition list, select a conditional operator to use and then enter the value to test against.
- Click Add Filter to add the filter to the panel.
- After finalizing the selection, click Apply Filters.
- Optional To add another filter, click + Add Filter and repeat the steps above.
- Optional To change a filter that you have defined, do any of the following:
- To modify a filter, make your changes and click Apply Filters.
- To temporarily disable a filter, click the toggle
 .
. - To delete a filter, click
 .
.
- To save your changes, click Save and then Save again.