Bulk importing risks
Bulk import risks if you need to avoid time-consuming manual data entry or migrate data from another system.
You can also update multiple risks at once using sessions in Bulk Importer. For more information, see Update existing risks in bulk.
How it works
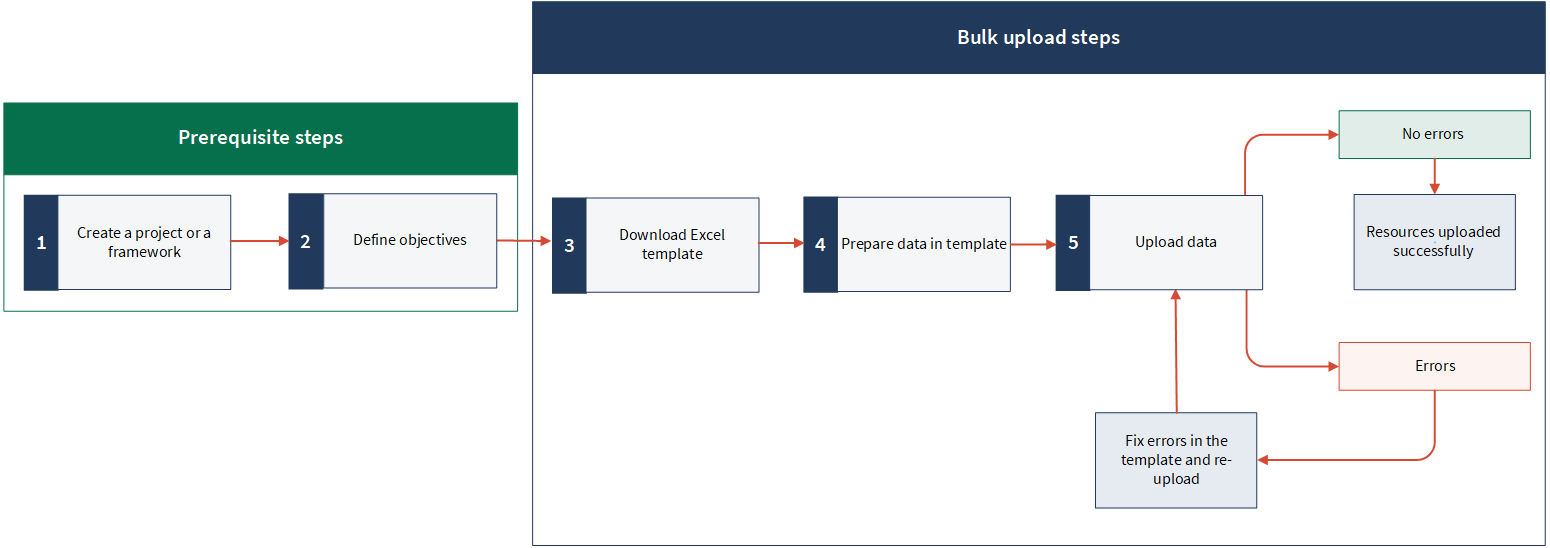
You open a new Bulk Importer session and download the Excel template from the Bulk Importer page in the Platform home. You prepare data in the template and then you upload the template in the Bulk Importer page.
Where are the uploaded risks?
Once you upload risks, the data is accessible within the Project Plan or Risk Control Matrix of the project or framework.
Risks are also available in the downloadable Risk Control Matrix reports and the OrganizationNameProject Report (final audit report).
Before you start
Before you begin to import risks, you need to:
- Create a project through the Bulk Importer by filling in the Projects worksheet or from the user interface; OR
create a framework through the Bulk Importer by filling in the Frameworks worksheet or from the user interface. - Define objectives through the Bulk Importer by filling in the Objectives worksheet or from the user interface.
Note
Using the Bulk Importer, you can create many Diligent One resources in a single import. You can fill in the worksheets of all the resources required and import them all, in one go.
Workflow
Permissions
Only System Admins can bulk upload Diligent One resources from Bulk Importer.
Upload new risks in bulk
Note
- Interface terms are customizable, and fields and tabs are configurable. In your Diligent One organization, some terms, fields, and tabs may be different.
- If a required field is left blank, you will see a warning message: This field is required. Some custom fields may have default values.
Open a new Bulk Importer session and download the Excel template
-
Open the Platform home page (www.diligentoneplatform.com).
Note
Diligent One Platform also supports the domain www.highbond.com. For more information, see Supported domains.
Note
If your company uses more than one instance in Platform home, make sure the appropriate instance is active.
-
Select Platform Settings, and under Organization management, select Organization.
-
On the page that appears, in the Bulk Importer section, click Manage bulk resources.
A new Bulk Importer session begins, with the session ID appended to the URL.
CautionAlways begin a new session to add new resources, else you may lose previously uploaded data.
 Learn more
For example: You want to import 200 entities in two batches (100 +100). If you upload the batches one after the other in the same session, then after you upload the second batch, the data uploaded in the first batch will get replaced with data in the second batch. To avoid this data loss, always upload the first batch in one session and begin a new session for the next batch. Likewise, begin new session to add more new resources.
NoteYou can use previous sessions to update previously uploaded data. For more information, see Update functionality in the Bulk Importer.
-
Under Select resource, select one of the following options in the resource type:
- Projects > Project names To create risks for a particular project. The template is dynamic and and has built-in configurations of the selected project. Using this method, you can create multiple Diligent One resources (objectives, risks, controls, and mitigations) belonging to a particular project.
- Frameworks > Framework names To create risks for a particular framework. The template is dynamic and has built-in configurations of the selected framework. Using this method, you can create multiple Diligent One resources (objectives, risks, controls, and mitigations) belonging to a particular framework.
- Projects > Project types To create risks for a project or a framework, based on a project type. The template is dynamic and has built-in configurations of the selected project type. Using this option, you can add multiple Diligent One resources (projects, frameworks, objectives, risks, controls, and mitigations), based on a project type. You can do the same thing using the Frameworks > Project types option too.
- All resources To bulk import all resources at once: projects, frameworks, objectives, risks, controls, mitigations, issues, actions, requests, entities, and compliance maps. The template is static and it takes some effort to complete, as you will have to figure out the configuration of the resources manually.
- Click Download .xlsx Template.
The Excel template saves to your local machine.
Prepare data in the template
- Open the downloaded template and go to the Risks worksheet.
- Copy and paste or enter your data into the template.
For help with entering data, see Tips for preparing content.
Note
- If you use Add-In for Excel, ensure the ACL Add-In option is disabled before modifying the Excel template. To learn how to do it, see Configuring Add-In for Excel.
- Do not change the name of the worksheet or the fields. These are case sensitive and must not be modified.
- The maximum number of rows that can be uploaded at once is 2000 (including all the worksheets).
Field Description mandatory
Specifies a unique ID for the resource. This must be unique for each row in the worksheet.
It can contain a combination of text and numbers, and the maximum length is 255 characters.
This field is the primary key for each row in the template. You will need this key if you want to update this resource again.
Important
You can use reference IDs to associate resources to one another, on the fly. For example, you can create a new project and a new objective associated to that project in the same upload. You can do this by creating a link between the project and the objective by providing referenceId in the required field.
To learn more about associating Diligent One resources in Bulk Importer, see Using reference IDs to link resources in Bulk Importer.
Note
Reference IDs are required when you add or update resources using the Bulk Importer. They are not available when you add / update resources from the user interface of Diligent One.
objectiveId
mandatory
Specifies ID of the objective that you want to associate this risk to.
You can find objective ID in the URL when you navigate to an objective.
For example:
https://stark.projects.diligentoneplatform.com/
audits/13659/objectives/6616, where 6616 is the objective ID.NoteAlternatively, in this field, you can provide reference ID of a new objective that you have added in the current template. This will associate the risk with the objective when you upload the template.
To learn more about associating Diligent One resources in Bulk Importer, see Using reference IDs to link resources in Bulk Importer.
For information about objectives, see Defining objectives .
title
Specifies title of the risk.
For information about risks, Defining risks and controls.
description
mandatory
Specifies detailed description of the risk.
TipUse HTML tags to format text. For example: <b>, <i>, <ol>, <ul>.
For information about risks, Defining risks and controls.
riskId
Specifies reference number or code for the risk.
For information about risks, Defining risks and controls.
impact
Specifies consequences of the risk occurring.
The options available depend on the project type.
likelihood
Specifies probability of the risk occurring.
The options available depend on the project type.
position
Specifies value that determines the order in which the risk is displayed.
TipFill in the values in sequential order, so that the resources appear in the same order after the import.
entities
Specifies entity IDs of the entities that are tagged to the risk.
You can find entity ID in the URL when you navigate to an entity.
For example:
https://stark.projects.diligentoneplatform.com/
auditable_entities/33055, where 33055 is the entity ID.You can provide multiple IDs separated by commas.
NoteAlternatively, in this field, you can provide reference ID of a new entity that you have added in the current template. This will associate the risk with the entity when you upload the template.
To learn more about associating Diligent One resources in Bulk Importer, see Using reference IDs to link resources in Bulk Importer.
For more information about entities, see Setting up entity tagging.
customAttributes_1_term - customAttributes_n_term
Specifies custom attribute fields 1 through n.
The custom attributes in the Excel template depend on the type of template, as follows:
- Project names / Framework names / Project types: By default, the template will contain the custom attribute fields defined in the project type.
- All resources: You have to manually check and enter the custom attribute fields, both the term and the value. The template will have one pair of custom attribute term and value, and you can add nine more pairs if required. To add, follow the same naming convention by adding a counter, for example: customAttributes_2_term, customAttributes_2_value, etc.
The custom attributes of a project, framework, and their components are defined in the project type. For more information about custom attributes, see Customizing terms, fields, and notifications.
customAttributes_1_value - customAttributes_n_value
Specifies custom attribute values 1 through n.
The custom attributes in the Excel template depend on the type of template, as follows:
- Project names / Framework names / Project types: By default, the template will contain the custom attribute fields defined in the project type.
- All resources: You have to manually check and enter the custom attribute fields, both the term and the value. The template will have one pair of custom attribute term and value, and you can add nine more pairs if required. To add, follow the same naming convention by adding a counter, for example: customAttributes_2_term, customAttributes_2_value, etc.
The custom attributes of a project, framework, and their components are defined in the project type. For more information about custom attributes, see Customizing terms, fields, and notifications.
Note- If a value begins with a square bracket or contains a comma, semicolon, or a line break, enclose the value in double quotation marks (" ").
For example: "[2021]", "First, second asset", "This is important; this too". - For a multiple choice field, you can add multiple values by separating each value with a comma.
- For a dropdown list or a multiple choice field, ensure the values are exactly the same as provided in the options.
customFactors_1_term - customFactors_n_term
Specifies custom risk scoring factors 1 through n.
The custom risk scoring factors in the Excel template depend on the type of template, as follows:
- Project names / Framework names / Project types: By default, the template will contain the custom factors defined in the project type.
- All resources: You have to manually check and enter the custom factors, both the term and the value. The template will have one pair of custom factor term and value, and you can manually add four more pairs if required. To add, follow the same naming convention by adding a counter, for example: customFactors_2_term, customFactors_2_value, etc.
The custom attributes of a project, framework, and their components are defined in the project type. For more information about custom attributes, see Customizing terms, fields, and notifications.
customFactors_1_value - customFactors_n_value
Specifies custom risk factor values 1 through n.
The custom risk scoring factors in the Excel template depend on the type of template, as follows:
- Project names / Framework names / Project types: By default, the template will contain the custom factors defined in the project type.
- All resources: You have to manually check and enter the custom factors, both the term and the value. The template will have one pair of custom factor term and value, and you can manually add four more pairs if required. To add, follow the same naming convention by adding a counter, for example: customFactors_2_term, customFactors_2_value, etc.
The custom attributes of a project, framework, and their components are defined in the project type. For more information about custom attributes, see Customizing terms, fields, and notifications.
Note- If a value begins with a square bracket or contains a comma, semicolon, or a line break, enclose the value in double quotation marks (" ").
For example: "[2021]", "First, second asset", "This is important; this too". - For a multiple choice field, you can add multiple values by separating each value with a comma.
- For a dropdown list or a multiple choice field, ensure the values are exactly the same as provided in the options.
NoteIn the dynamic template, for a dropdown field, the options in the dropdown list appear only for the first row. To get those options for more rows, copy the first row and paste it to the rows required.
- Save and close the template.
Tips for preparing content
Preparing content involves:
- copying and pasting your source data into the Excel template
- entering data, where applicable, in the Excel template
- saving the template in preparation for bulk upload
The table below provides a variety of tips you can use to quickly and efficiently prepare your content in the Excel templates.
| Task | Steps |
|---|---|
|
View both the template and your source document on one screen
|
Windows users: Press Windows key + right or left arrow. Mac users: Drag the window to fill one half of the screen. |
| Copy/paste data from multiple cells in the template |
|
| Treat a number or formula as text | In Excel, insert an apostrophe before the number in the formula. |
| Change the column width or row height to automatically fit your data |
In Excel, do any of the following:
|
| Enter sequential numeric data |
|
| Use formulas to calculate data |
|
| Sort or filter data in a single column |
|
Using reference IDs to link resources in Bulk Importer
Reference ID is a field in the Bulk Importer Excel template. It is the first field in all the worksheets and is available for all the resources. It is a unique identifier for each record in the worksheet.
Using reference IDs, you can associate Diligent One resources to each other, on the fly. For example, you can create a project and an objective that is associated to the project in the same import. You can do this by providing referenceId in the required field.
Example 1
Scenario
Using the Bulk Importer, you want to accomplish the following in a single upload:
- Create a new project.
- Create a new objective and associate it to the new project.
Process
You download and open the Excel template. You go to the Projects worksheet and fill in the required fields including the referenceId. You copy the referenceId of the new project.
Then, you go to the Objectives worksheet, add the new objective details, and in the parentResourceId field, you paste the referenceId that you copied from the Projects worksheet. By doing this, you are associating the new objective to the new project.
Result
When you upload the template, the following things happen:
- A new project is created.
- A new objective is created, and the new objective is associated to the new project.
Example 2
Scenario
Using the Bulk Importer, you want to accomplish the following in a single upload:
- Create 1 new project.
- Create 1 new objective and associate it to the new project.
- Create 2 new risks and 2 new controls and associate them to the new objective.
Process
You download and open the Excel template, go to the Projects worksheet and add in details of the new project such as the referenceId and other required fields. You copy the referenceId of the new project.
Then, you go to the Objectives worksheet and add in the new objective, and in the parentResourceId field of the objective, you paste the referenceId of the new project that you copied from the Projects worksheet. You now copy the referenceId of the new objective.
Then, you go to the Risks worksheet, add in the new risks, and in the objectiveId field of each risk, you paste the referenceId of the new objective that you copied from the Objectives worksheet.
Finally, you go to the Controls worksheet, add in the new controls, and in the objectiveId field of each control, you paste the referenceId of the new objective that you copied from the Objectives worksheet.
Result
When you upload the template, the following things happen:
- 1 new project is created.
- 1 new objective is created, and it is associated to the new project.
- 2 new risks and 2 new controls are created, and they are associated to the new objective.
Upload data
Do one of the following:
Result A success or failure message appears depending on the outcome of the process, and the latest session is updated in the Sessions table.
Sessions in Bulk Importer
A session in the Bulk Importer is a series of user interactions to import Diligent One resources. Each user session is recorded in the Sessions table.
The Sessions table contains the following information.
|
Field Name |
Description |
|---|---|
|
Web Sessions |
Shows the list of web sessions. A web session refers to a session completed using the Bulk Importer user interface. A new session begins each time you open the Bulk Importer page. |
|
API Sessions |
Shows the list of API sessions. An API session refers to a session completed using an API platform such as Postman, etc. |
|
Refresh |
Reloads the Sessions table. |
|
Session ID |
Session identifier. In Web Sessions, you can click on the session ID to go to a particular session, and the session ID is appended to the URL. For example: https://stark.bulkimporter.diligentoneplatform.com/import/bcc1e04e-4cd3-46d2-a8be-0b9083baccdc, where Note
Session IDs of both the web and API sessions look similar, ensure not to interchange the IDs to avoid any errors. |
|
Date |
Shows the date and time of the session. You can sort the date in ascending or descending order. |
|
Uploaded By |
Shows the name of the user. |
|
Status |
Shows the status of the upload, if it was successful or not. You can click on the status to view the complete import details. |
|
File Name |
Shows the name of the uploaded template / error log. For example: HighBond_Template.xlsx, ErrorLog.xlsx. Template You can click and download the template to correct any previously uploaded data. Error log An error log is generated when an upload fails. You can check the error log to rectify the errors and re-upload the template. Note
|
Update existing risks in bulk
You can update multiple items at once in Bulk Importer using sessions.
Note
You can only update resources that you have uploaded using Bulk Importer.
How it works
You open a previous session from the Bulk Importer page. You open the template uploaded in the previous session and make the required changes. Then, you upload the template in the Bulk Importer page.
Important
- Use previous sessions to make changes or correct previously uploaded data.
- Begin a new session to upload new resources, even when they are related to previously uploaded data.
For example: You have uploaded a project and a few objectives in a previous session. Open the same session to update those resources. Begin a new session if you want to upload risks, controls, or any other resource related to that project or objectives.
Requirements before you update
Before you can update, you must do the following:
-
Decide which session to select. This is required as the uploaded data is linked to a session. Therefore, you have to open the session linked to the data you want to update. For information about sessions, see Sessions in Bulk Importer.
-
Ensure you have access to the Excel template uploaded in the session that you want to select. The template contains reference IDs, which are unique identifiers for each row in the template. These are required to update the data. For more information about reference IDs, see Prepare data in the template.
CautionData is updated based on the corresponding session and reference IDs. Mismatch between the session and the reference IDs may create duplicates or result in an error.
Steps to update
Note
- Interface terms are customizable, and fields and tabs are configurable. In your Diligent One organization, some terms, fields, and tabs may be different.
- If a required field is left blank, you will see a warning message: This field is required. Some custom fields may have default values.
Open a previous session
No previous sessions will be available when you open the Bulk Importer page for the first time. You must upload at least once to see the session details.
For more information about sessions, see Sessions in Bulk Importer.
-
Open the Platform home page (www.diligentoneplatform.com).
Note
Diligent One Platform also supports the domain www.highbond.com. For more information, see Supported domains.
Note
If your company uses more than one instance in Platform home, make sure the appropriate instance is active.
-
Select Platform Settings, and under Organization management, select Organization.
-
On the page that appears, in the Bulk Importer section, click Manage bulk resources.
-
Scroll down to the Sessions section and click on the Session ID of your choice.
Result The session loads with the selected session id appended to the URL.
NoteEnsure you select the appropriate session, in which you want to update the previously uploaded data. Mismatch between the session and the reference IDs may create duplicates or result in an error. For more information, see Requirements before you update.
Update data in the template
-
Open the Excel template uploaded in the session that you selected in the previous step. This file contains the previously uploaded data along with the reference IDs. For more information, see Requirements before you update.
NoteEnsure the ACL Add-In option is disabled before you modify the Excel template, else the upload will fail. For more information about ACL Add-Ins, see Configuring Add-In for Excel.
-
Go to the corresponding worksheet and update the data based on the reference IDs. For more information about the fields, see Prepare data in the template
NoteEnsure you update the values corresponding to the reference IDs, based on which the previously uploaded data will be updated. Mismatch may create duplicates or result in an error.
-
Save and close the file.
Upload data
Do one of the following:
Result A success or failure message appears depending on the outcome of the process, and the latest session is updated in the Sessions table.
Troubleshooting
You can download and check the error log from the Sessions table. Understand common bulk upload errors and learn how to fix errors.
The following table provides a list of possible errors that may occur when uploading the template.
| Error | Solution(s) |
|---|---|
| There may be more than 2000 rows in the uploaded file (including all the worksheets). | Remove the extra rows from the template and re-upload. |
| Mandatory fields may be blank or missing in the uploaded file. | Ensure that all mandatory fields (marked with red and orange column names in the template) are completed. Note If you do not provide data in the mandatory fields, the row is not processed. |
| Data format may be incorrect. |
Ensure that data in text fields is valid and does not exceed the maximum field length: 255 characters. Rich text fields do not have a character limit. |
| Data values may be invalid or may not match the dropdown values. |
For example: The value for received and sendRecurrentNotifications fields in the Requests sheet must be True or False. |
| Invalid fields in the template. |
|
| Template may not be in expected format. |
Ensure the file format is .xlsx. |
| Invalid worksheet names. |
Do not change the name of the worksheet. |
| Session may have expired. |
Refresh the page and try uploading again. |
| Session ID may be invalid. | Ensure you are using a web session ID. |