Setting up entity tagging
Set up entity tagging to report on issues or results from different cross-sections of the business and allow stakeholders at all levels of the organization to obtain the information they require.
How it works
Entities may be business units, departments, locations, or key initiatives that are within the scope of the organization. Entities have a hierarchical structure composed of parent and child entities. Once you have set up your organization's nested entity structure, you can tag different items with entities.
Tagging items with entities
Depending on your role, you can tag different items with entities.
Note
- Interface terms are customizable, and fields and tabs are configurable. In your instance of Diligent One, some terms, fields, and tabs may be different.
- If a required field is left blank, you will see a warning message: This field is required. Some custom fields may have default values.
| Item | Roles that can apply tags to items | Steps |
|---|---|---|
| Project / Framework | Professional Manager |
Project
Framework
|
| Objective |
|
|
| Risk |
|
|
| Control |
|
|
| Issue |
|
|
Inherited entity tags
Objectives, risks, controls, and issues inherit entity tags by default, based on a hierarchy in Projects and Frameworks. Inherited entity tags cannot be removed.
The following applies:
- Project / Framework No inherited entity tags.
- Objective An objective tagged with an entity inherits the entity tags associated with the project or framework.
- Risk A risk tagged with an entity inherits the entity tags associated with the project / framework and objective.
- Control A control tagged with an entity inherits the entity tags associated with the project / framework and objective.
- Issue Issues inherit entity tags based on where they are created in a project.
Example
You create an issue on the Control page and tag the issue with an entity.
Result The issue tagged with an entity will inherit the entity tags associated with the project, objective, and control:
| Item in Projects | Tagged with… | Inherited entity tags |
|---|---|---|
| Project | North America | N/A |
|
Canada | North America |
|
British Columbia | North America, Canada |
|
British Columbia | North America, Canada |
| Issue (created on the Control page) | Vancouver | North America, Canada, British Columbia |
Reporting on entities
There are a variety of ways you can report on entities across your organization:
| Action | App | Detailed information |
|---|---|---|
| Build entity-specific reports related to issues | Issue Tracker | Downloading pre-built and custom reports |
| Build comprehensive entity-specific reports and use entities to filter data sets | Reports | |
|
Report on coverage across different projects in an assurance plan by entity category or entity |
Assurance Plans | Overview of Assurance Plans |
Updating entities
Entities apply to all frameworks and active and archived projects in the Diligent One instance. Updates to entities are reflected in the respective frameworks and projects.
Syncing projects with frameworks
Any updates to entities associated with items in a framework will not prompt you to update the item in the project, and vice versa.
Tracking changes to entities
When an entity (associated with a project / framework, objective, risk, control, or issue) is explicitly changed, the change is logged under History on the relevant page. Changes to associated child entities are also tracked.
Changes to entities under System administration > Manage entities are not tracked.
For more information on tracking changes in Projects, see Projects activity logging.
Deleting entities
If you delete an entity, it is removed from all frameworks and active and archived projects. Archived projects do not retain previous entity configurations from when the project was archived.
Example
Nested entities
Scenario
You are a manager in a sales company and you need to report on issues related to different regions, countries, provinces, and cities.
You define the following relationships using nested entities:
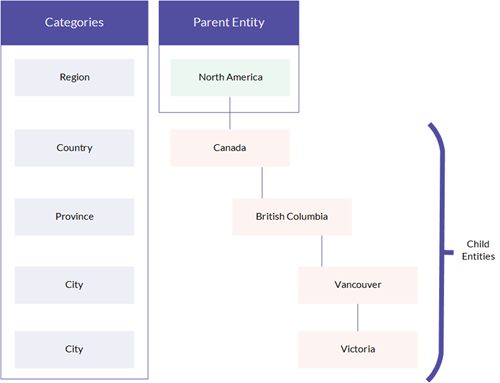
Process
You tag a project to the North America entity and an issue within the project to the Victoria entity.
Result
Tagging the project to the parent entity, North America, automatically tags the project with all child entities (Canada, British Columbia, Vancouver, and Victoria). You can deselect specific child entities that do not apply.
Tagging the issue to the Victoria child entity automatically tags the issue with the parent entity (North America) and any ancestral child entities (Canada and British Columbia).
Permissions
Only Project Admins can set up a nested entity structure for the organization.
Add entity categories
Categorize your organization's entities into meaningful groups.
Rich text fields cannot exceed 524,288 characters.
-
From the Launchpad home page (www.diligentoneplatform.com), select the Projects app to open it.
If you are already in Diligent One, you can use the left-hand navigation menu to switch to the Projects app.
Note
Diligent One Platform also supports the domain www.highbond.com. For more information, see Supported domains.
The Projects home page opens.
- Under System administration, click Manage entities.
- Click Manage Categories.
- Click New Category.
- Enter the relevant information and click Save:
Field Description Category the name of the new entity category
The maximum length is 60 characters.
Description
optional
the description of the new entity category Result The most recently added category is listed at the bottom of the categories list.
You can reorder the categories by dragging each category item into a new position, or clicking the Category column title to order the list in ascending or descending order alphabetically.
Add multiple entity categories
For information about adding multiple entity categories at once, see Bulk importing entity categories
Manage entity categories
Manage existing entities in your organization and categorize them into meaningful groups.
Rich text fields cannot exceed 524,288 characters.
-
From the Launchpad home page (www.diligentoneplatform.com), select the Projects app to open it.
If you are already in Diligent One, you can use the left-hand navigation menu to switch to the Projects app.
Note
Diligent One Platform also supports the domain www.highbond.com. For more information, see Supported domains.
The Projects home page opens.
- Click Manage Categories.
- Do one of the following:
- Click edit next to the category you would like to work with.
- Click the appropriate category under the Category column.
- Update the relevant information and click Save:
Field Description Category the name of the entity category
The maximum length is 60 characters.
Description
optional
the description of the entity category Entities In This Category
optional
specifies the entities associated with the category
If you have not added any entities, click + Add New Entity. You can add or remove entities from a category by selecting the entities you want to add or deselecting the entities you want to remove. Selected entities are highlighted in green.
Result The entity category is updated.
Add entities
Add entities to enable reporting on issues or results from different cross-sections of the business.
-
From the Launchpad home page (www.diligentoneplatform.com), select the Projects app to open it.
If you are already in Diligent One, you can use the left-hand navigation menu to switch to the Projects app.
Note
Diligent One Platform also supports the domain www.highbond.com. For more information, see Supported domains.
The Projects home page opens.
- Under System administration, click Manage entities.
- Click New Entity.
- Enter the relevant information and click Save:
Field Description Name the name of the new entity
The maximum length is 60 characters.
Note
Any entity names that include commas are represented as two different entities in the Reports app. For example, specifying Washington, DC as the entity name in Projects becomes Washington and DC in Reports. To prevent incorrect data from displaying in Reports, do not enter a comma in the entity name in Projects.
Category
optional
specifies that category associated with the new entity
Parent Entity
optional
specifies the direct ancestor entity associated with the new entity Child Entity
optional
specifies the direct descendant entity associated with the new entity Description
optional
the description of the new entity Result The new entity displays in the nested tree structure.
Add multiple entities
For information about adding multiple entities at once, see Bulk importing entities
Manage entities
Manage existing entities to enable reporting on issues or results from different cross-sections of the business.
-
From the Launchpad home page (www.diligentoneplatform.com), select the Projects app to open it.
If you are already in Diligent One, you can use the left-hand navigation menu to switch to the Projects app.
Note
Diligent One Platform also supports the domain www.highbond.com. For more information, see Supported domains.
The Projects home page opens.
- Under System administration, click Manage entities.
- Optional. Filter entities by category.
- Do one of the following:
- Click Edit beside the entity you would like to work with.
- Click the appropriate entity under the Name column.
- Complete any of the following tasks:
- Click the Select Parent Entity dropdown list.
- Select an entity.
If you need to add a new parent entry, click the Add New Entity link in the dropdown list.
- Click the Select Category dropdown list, and select a category for the entity.
If you need to add a category for the entry, click the Add New Category link in the dropdown list.
- Click the text box under Name and enter the new name of the entity.
- Click the text box under Description and edit the description of the entity.
- Click Add/Remove beside Projects associated to this Entity.
If you need to associate a new project, click Select a project.
- Add or remove projects by selecting the projects you want to add or deselecting the projects you want to remove.
Selected projects are highlighted in green.
- Click Save.
- Click Delete Entity at the bottom of the page.
- Click Delete in the confirmation dialog box.
| Actions | Steps |
|---|---|
|
Update a parent entity |
|
|
Update an entity category, name, or entity description |
|
| Update a child entity |
Click Add/Remove beside the child entity, and select an entity. If you need to add a new child entry, click the Add Child Entity. |
| Associate a project with the nested entity structure |
|
| Delete an entity |
|