Working with assets
Assets represent things that are of value to your organization. Assets can be tangible, like laptops, servers, and software, or they can be intangible, like third-party business relationships, intellectual property, and policies. By tracking your organization's assets, you protect your organization from fraud, theft, compliance issues, and unacceptable risk. In the filing cabinet analogy, assets are folders.
Note
When working with assets in the Projects or Frameworks apps, you must use the IT Risk and Control Assessment project type. You can also use the Secure Controls Framework template, which comes pre-populated with a catalog of risk categories, controls, and more content that you may find useful.
How it works
You create assets in the Asset Inventory app.
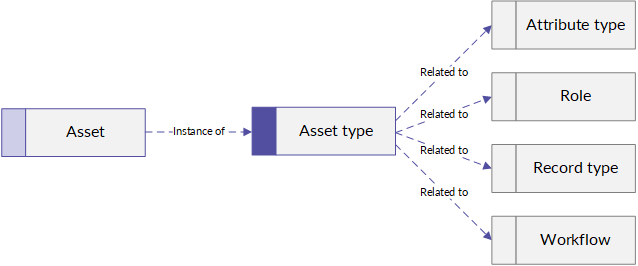
All assets are instances of an asset type. They are not children of that asset type (assets are root objects). The asset type is a class that defines the format and behavior of its assets: what attributes they have, what workflow they move through during their life-cycles, and who can see them and work on them. The exact behavior of each asset type is determined by its relationship to a workflow, record types, attribute types, and roles.
Example
Scenario
As part of your organization's third-party risk management program, you track all third-party assets using an asset type called Third Party.
Your organization wants to do business with a new vendor called Slack, to handle your internal communication needs. Before this can happen, you need to create a new Slack asset and put it through your normal third-party risk assessment process.
Process
- Navigate to the Third Party asset type.
- Create a new asset called Slack.
- Move Slack through your Third Party asset workflow.
- Register and categorize the asset by entering critical details about Slack, like the vendor's owner, risk manager, its type, a brief description, and a criticality level.
- Assess Slack's risk, either manually or by distributing a risk assessment and allowing Diligent One to calculate an assessment for you.
- Activate Slack.
Result
Your Slack asset has been created, registered, categorized, and assessed. It is marked as Activated, and the purchase can go through. Periodically, you can re-assess Slack, and if your organization stops using it one day, you can archive it.
Creating, updating, and deleting asset types
We supply asset types as part of your solution. You cannot create, update, or delete asset types on your own, but you can engage our consulting team to customize your environment.
Managing associations between asset types and risk categories in frameworks
Manage associations between asset types and risk categories in a framework. Then, you can use those associations in a project, where you can assess risks and controls in the context of those assets.
-
From the Platform home page (www.diligentoneplatform.com), select the Frameworks app to open it.
If you are already in Diligent One, you can use the left-hand navigation menu to switch to the Frameworks app.
Note
Diligent One Platform also supports the domain www.highbond.com. For more information, see Supported domains.
- Open the framework you want to associate the asset types to.
- On the Assessment tab, navigate to a risk category's Records tab.
- Under Associated asset types, click Manage associations.
- In the Manage asset type associations panel, select or deselect asset types to create or remove associations between them and the framework.
- Click Save.
Result You can now create a project using the asset type associations in your framework. If required, you can then add additional associations at the project level.
Importing risk categories from a framework to a project
After associating risk categories to asset types in a framework, you can import the risk categories into a project.
-
From the Platform home home page (www.diligentoneplatform.com), select the Projects app to open it.
If you are already in Diligent One, you can use the left-hand navigation menu to switch to the Projects app.
Note
Diligent One Platform also supports the domain www.highbond.com. For more information, see Supported domains.
- Open a project you want to import objectives to.
The project dashboard opens.
- Click the Assessment tab.
- Click Import Risk Category.
- Select the appropriate framework from the Framework list that you want to import risk categories from.
- Select the risk categories you want to import.
- Click Import.
Result Diligent One imports your selected risk categories.
For more information, see Cloning and importing objectives.
Note
Interface terms are customizable, and fields and tabs are configurable. Elsewhere in Diligent One, the term for risk categories may vary.
Managing associations between assets and risk categories in projects
After you have associated asset types to risk categories in a framework, you can import those risk categories into a project. Then, in that project, you can choose individual assets from the asset types you associated with those risk categories, and mitigate the risks associated with those assets in your project.
Associating assets to projects
Create associations between assets and risk categories, so you can mitigate the risks associated with those assets in your project.
- Open the project you want to associate assets with, and click the Scoping & BIA tab.
- On the Scope tab, click Scope assets.
- In the Scope assets window, select an asset type and click Continue.
- Optional. Narrow down the list of assets by filtering by attribute types.
- Click Filter. In the Filter side panel, create one or more filters using any attribute types that have dropdown list inputs in Asset Inventory.
- Click Apply. Diligent One filters out the assets that don't match your criteria.
- Select the assets you want to associate with your project and click Continue.
- Select the risk categories to associate with your project and click Continue.
- Review and finalize your selected assets and risk categories. You can go back and make changes, or click Save and scope assets to continue with your selected associations.
After associating assets with your project, you can click on the asset names to view more details about them, or to remove the association from your project.
Removing associations between assets and risk categories
You can remove the association between assets and risk categories if the assets are no longer needed, or if they were associated to risk categories accidentally. By removing those associations, you remove the assets from the scope of the project.
- Open the project you want to remove an associated asset from, and click the Scoping & BIA tab.
- On the Scope tab, navigate to the asset type associated with the asset you want to remove and click the Expand icon
 .
. - Click the name of the asset you want to remove.
- In the Asset details panel that appears, click Remove asset.
- In the confirmation message that appears, click Remove asset.
- Repeat steps 1-5 for any remaining asset associations you want to remove from your project.
Result You have removed the associations between the required assets and risk categories from your project.
Creating assets
Add an asset to Asset Inventory, so you can store and gather information about it, assess the risks that come with it, and take actions to mitigate those risks.
-
From the Platform home page (www.diligentoneplatform.com), select the Asset Inventory app to open it.
If you are already in Diligent One, you can use the left-hand navigation menu to switch to the Asset Inventory app.
Note
Diligent One Platform also supports the domain www.highbond.com. For more information, see Supported domains.
- Click the asset type you want to add your asset to.
- Click +Add [asset type].
- In the Add [asset type] dialog box, enter a name for your new asset.
- Click Add. Diligent One creates a page for your asset.
- On the Details tab, click the fields you want to edit to enter information about the asset. Once your changes are made, they are saved.
Result Your asset has been created. You can begin to move it through its life-cycle by transitioning it to another status.
Updating asset details
You can update the data associated with an asset to reflect new information when that asset changes.
-
From the Platform home page (www.diligentoneplatform.com), select the Asset Inventory app to open it.
If you are already in Diligent One, you can use the left-hand navigation menu to switch to the Asset Inventory app.
Note
Diligent One Platform also supports the domain www.highbond.com. For more information, see Supported domains.
- Navigate to the asset type you want to edit.
- In the table that contains asset details, click the name of the asset you want to edit. If you have a large number of assets, you can search, sort, and filter to find the right one.
- In the Details tab, click the fields you want to edit to update the required details. Once your changes are made, they are saved.
- Optional. If your asset's status has also changed, you can transition it to another status.
Transitioning assets to another status
Transitioning assets to another status is how you move assets through their life-cycle. Depending on the workflow an asset type uses, different actions can happen during a transition. For example, Diligent One might check that the required fields contain data, or it may trigger a questionnaire to get further information about the asset.
-
From the Platform home page (www.diligentoneplatform.com), select the Asset Inventory app to open it.
If you are already in Diligent One, you can use the left-hand navigation menu to switch to the Asset Inventory app.
Note
Diligent One Platform also supports the domain www.highbond.com. For more information, see Supported domains.
- Navigate to the asset type for the asset you want to transition.
- In the table that contains asset details, click the name of the asset you want to transition. If you have a large number of assets, you can search, sort, and filter to find the right one.
- In the visual workflow, if it is not already expanded, expand the Current status to reveal the stage the asset is currently at and available statuses that the asset can transition to.
Note
Alternatively, click the Actions button to see a list of available statuses and actions relative to the current status.
You can hover over the various statuses and actions to get more context about what each status or action means within the overall workflow before transitioning the asset.
- Click the status you want to transition the asset to. This will transition the asset to the chosen status.
Note
Different status transitions can require different conditions such as certain attributes being filled in, or they can trigger events like sending questionnaires to gather incomplete information. If you have problems moving your asset to another status, contact a System Admin or your Diligent representative for assistance.
Linking assets with other assets or asset records
You can create custom relationships between assets and other assets, or with asset records. For more information, see Managing relationships in Asset Inventory.
Deleting assets
You can permanently delete assets. Generally, unless an asset was created in error, it's better to transition it through its normal life-cycle.
Caution
Deleting an asset cannot be undone. This will also delete any associated work, including its asset profile, and any related assessments or related records. Make sure you do not need any of these things before you delete an asset.
-
From the Platform home page (www.diligentoneplatform.com), select the Asset Inventory app to open it.
If you are already in Diligent One, you can use the left-hand navigation menu to switch to the Asset Inventory app.
Note
Diligent One Platform also supports the domain www.highbond.com. For more information, see Supported domains.
- Click the asset type for the asset you want to delete.
- In the table that contains asset details, click the name of the asset you want to delete.
- On the page for that asset, click
 and click Delete. This prompts a dialog box with a warning message requesting confirmation.
 - Click Delete to confirm. The asset and any associated work is deleted.