Automating a remediation workflow
Results helps you automate your organization's remediation workflow when investigating potential issues. Using triggers, questionnaires, and notifications, you can manage a large number of potential issues, identifying and prioritizing those which need immediate attention.
Scenario
You are an IT Security Professional, and you are performing a review of system access events that occur outside your organization's standard working hours. System access data is analyzed in Analytics and all system access events occurring outside working hours are exported to a table in Results.
Now, you need to create an automated workflow that determines whether or not the system was accessed by authorized employees. Any potential unauthorized access must be escalated to critical priority and assigned to the appropriate person for investigation.
Before you start
This tutorial walks you through a number of automation features in Results using sample data and a mock scenario. Before you can begin, you must set up a Collection and Analysis to store your table. If you are new to Results, or have never set up a Collection and Analysis, see Organizing data in Results before attempting this tutorial.
Note
Only Results Admins can complete this step. If you are not a Results Admin, then ask your administrator to create this Collection and assign you the Professional Manager role in the Collection.
-
From the Platform home page (www.diligentoneplatform.com), select the Results app to open it.
If you are already in Diligent One, you can use the left-hand navigation menu to switch to the Results app.
Note
Diligent One Platform also supports the domain www.highbond.com. For more information, see Supported domains.
- Create a Collection.
- Create an Analysis.
- Create a Data Analytic and import the following sample data file.
The scenario describes data exported from Analytics to help demonstrate how the entire Diligent One platform works together. However, for this tutorial we will keep it simple and import the provided file into the Data Analytic.
Once you import the file, set the data types for each column as follows:
- event_id Character
- date Date
- access_time Time
- employee_no Character
- employee_email Character
Create a questionnaire
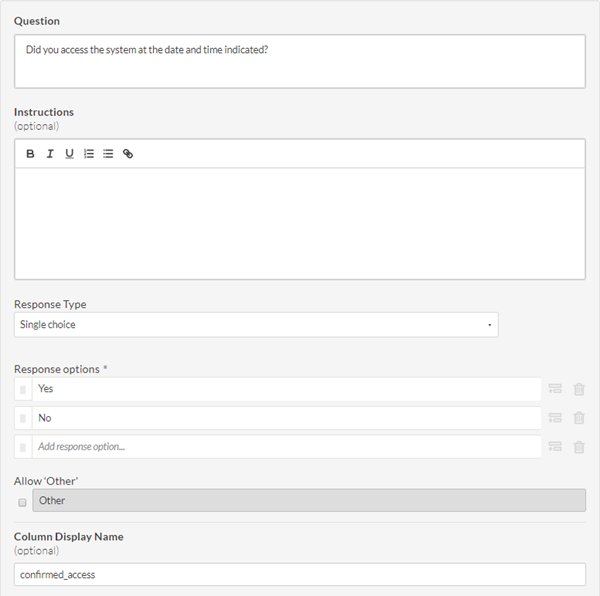
The first thing you need to do for each potential instance of unauthorized access is determine whether or not the employee listed in the record did in fact access the system. To do this, use a questionnaire to ask the employee on the record if they accessed the system at the date and time indicated.
-
From the Platform home page (www.diligentoneplatform.com), select the Results app to open it.
If you are already in Diligent One, you can use the left-hand navigation menu to switch to the Results app.
Note
Diligent One Platform also supports the domain www.highbond.com. For more information, see Supported domains.
- Click the name of the collection you made for this tutorial.
- Click Questionnaires.
- In the Manage Questionnaires section, click Add and provide a name and instruction for the questionnaire.

- At the bottom of the page, click Save.
- Click Add and include a Single choice question that asks the employee if they accessed the system at the date and time indicated.
You may need to scroll up to the top of the page to enter the question text.
- At the bottom of the page, click Save.
- Return to the main Collection page by clicking the name of the Collection in the upper-left corner of the page.
Result This questionnaire is now ready and you can use this tool to add human context to the information uncovered in the system access testing. Based on the responses you gather, you can escalate records of system access that the employee denies making as possible unauthorized access.
Note
The employee sees the access date and time in the side bar of the questionnaire when they are responding.
Build a new record trigger
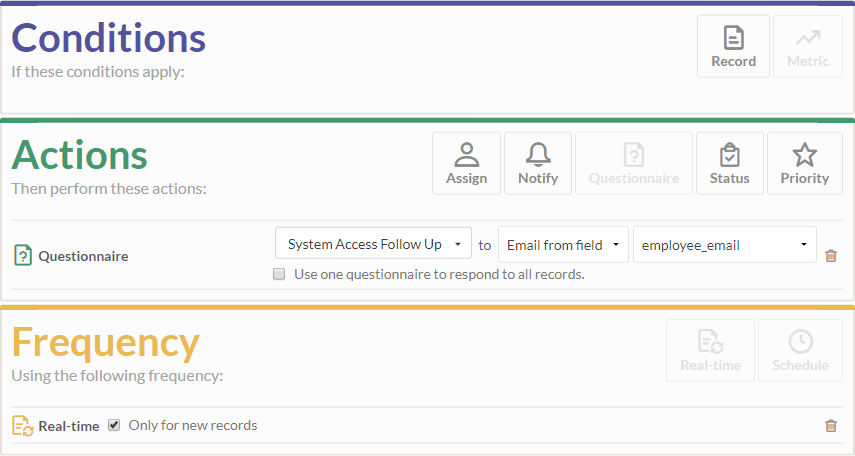
When new records are exported to Results, you need to send the questionnaire you created to the employee listed in each record. You could do this manually, but that would be slow and tedious. Instead, you can use a trigger to automatically send the questionnaire to the employee.
- On the Data Analytic, click the button in the Triggers column.
- Click New.
- Configure a Real-time trigger on Record to send the questionnaire you created to the email address in the employee_email column for all new records.
Do not specify anything in the Conditions section.
- At the bottom of the page, click Save.
Result Now, whenever a system access record is added to the Data Analytic, the questionnaire is automatically sent to the employee whose account accessed the system. All that is left to do now is take action when the employee responds "no" to whether or not they accessed the system.
Build an escalation trigger
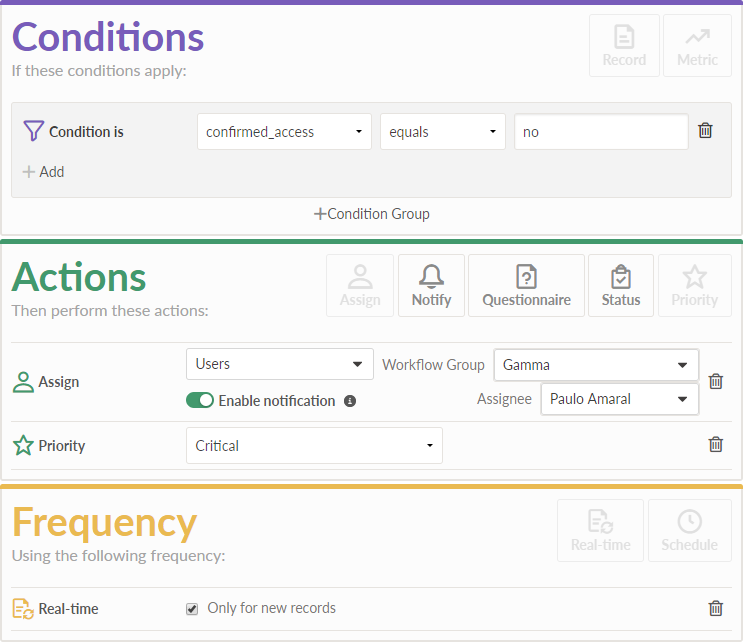
- On the Data Analytic, click the button in the Triggers column.
- Configure a Real-time trigger on Record with a condition that checks if the questionnaire response was "No" and takes the following actions when records are updated:
- escalates the priority of the record to critical
- assigns the record to a workflow group and user responsible for investigation
Although this scenario shows workflow group and user assignment, you can keep it simple and just assign the record to yourself.
- At the bottom of the page, click Save.
Result When employees respond "No" in the follow up questionnaire, the trigger notifies the appropriate people and escalates the priority of the record. These actions are automated and the entire process is managed through Results. There are no external systems or bottlenecks to contend with.
Discussion
What comes next?
You can test this automated workflow by doing the following:
- Delete all the records from the Data Analytic you created.
- Update the sample data spreadsheet to use a selection of real email addresses that you or your colleagues have access to.
- Re-import the file into the Data Analytic.
The emails receive questionnaire requests and depending on the answers provided, the escalation trigger automates the next stage of the process.
For more information about triggers, see Triggering automated activity.
What is the bigger picture?
Given the simple scenario in this tutorial, you could use triggers to automate most, or all of the remediation workflow. For example, you could create an additional trigger to close all records where the employee answers "Yes" as false positives.
This automation reduces the number of issues that require attention, allowing the investigation team to devote more time and energy to real issues.
The scenario in this tutorial is simple, and related to IT system access. However, given the flexibility of triggers and questionnaires, you can build an automated workflow to suit your organization's needs using the basic steps listed above.