Working with attributes in Asset Inventory
Attributes describe assets and records to provide detailed contextual data. Each attribute is a piece of data or metadata and can represent permanent or temporary information. A wide range of attributes are possible, and different asset types and record types can have very different attributes. Here are a few examples:
- Name
- ID
- Description
- Serial number
- Contact or owner information
- When the asset or record was created
- When the asset or record was last updated
- The physical location of a server
- The person assigned to a company laptop
- Relationships to other assets or records (e.g., "Impacts," "Is impacted by," "Related to," etc.)
- Supporting attachments
In the filing cabinet analogy, attributes are the data and information written on folders and pieces of paper.
How it works
You record attributes in assets and records.
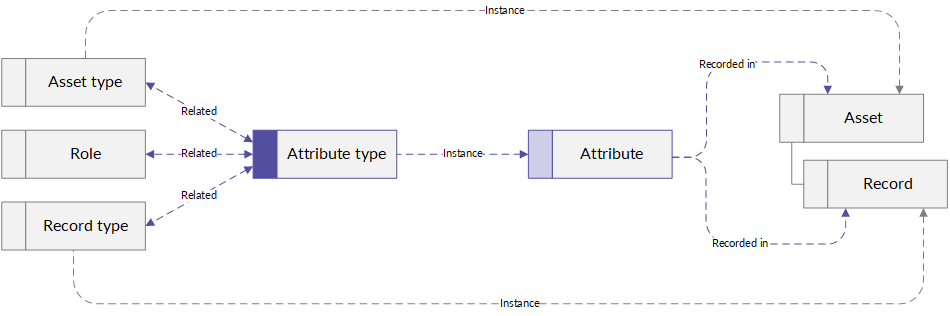
All attributes are instances of an attribute type. The attribute type is a class that defines the format and behavior of its attributes: which asset types and record types they appear in, what kind of data they store, whether it's required data, and how it looks and works in Diligent One's UI. You can think of the attribute type as an empty container, and the attributes as definitions. The exact behavior of each attribute type is determined by the way it is configured and its relationship to asset types, record types, and roles.
Example
Scenario
Your colleague, Jorgeo, is listed as the owner for several third-parties whose tools your team uses. Jorgeo is retiring, so you need to transition ownership of those third parties to Ashley, another member of your team.
Process
- Navigate to the Third Party asset type.
- Open the third party you want to reassign and go to the Details tab.
- Find the Owner attribute, and change Jorgeo to Ashley.
- Repeat this step for each asset your need to transition to Ashley.
Result
Ashley is now listed as the owner for all of Jorgeo's assets and will be responsible for their risk management going forward.
Create, update, and organize attribute types
Creating attribute types
- Open Launchpad.
Note
If your company uses more than one instance in Diligent One, make sure the appropriate instance is active.
- Select Organization Settings > Configuration.
- Click Attribute types. The Attribute types page listing all of the available, existing attribute types opens.
- Click +Add attribute type. The Add attribute type dialog box opens.
- Fill out the fields in the dialog box to create an attribute type.
- Click Add. The dialog box closes and the attribute type appears in the list of attribute types.
Once created, attribute types can only be edited. They cannot be deleted.
Updating attribute types
- Open Launchpad.
Note
If your company uses more than one instance in Diligent One, make sure the appropriate instance is active.
- Select Organization Settings > Configuration.
- Click Attribute types. The Attribute types page listing all of the available, existing attribute types opens.
- Select the attribute type you want to edit. The page for that attribute type opens.
- Click Edit. The General Information area becomes editable, and you can edit the Display name, Tooltip, select or unselect Required, and aspects of the Response type.
- Make your changes and click Save. A message appears to let you know that the attribute type was successfully saved.
Static fields such as the Admin name, Created by, Last updated by, and the Response type cannot be changed. The Response type itself cannot be changed, but aspects of it can be edited. For example, if the Response type is Boolean, Default True can be changed by toggling on or off.
Organizing attribute types into sections
Diligent consultants can also help you organize the attribute types associated with any given asset or record type into collapsible sections. Here's how it works:
- Attribute types can appear in multiple sections. For example, if you configure an asset type to have an Overview and a Key People section, you can include the Business Owner attribute type in both. If you update an asset's business owner in one section, the updated value will automatically appear in the other.
- You can hide attribute types by not associating them with any sections; however, doing so doesn't delete the attribute type or the values associated with it.
- When you navigate to a tab and/or expand or collapse a section, your URL updates to reflect your current view. If you send a colleague a link to an asset, they'll be able to see the exact attributes that you were looking at.
Metadata attribute types
Certain attribute types that indicate when the asset or record was created and last updated (e.g., the Created By attribute type), and the users who performed those actions, only appear in the Additional information section. This section appears at the bottom of every asset and record, under all default and specially configured sections.
Deleting attribute types
Attribute types cannot be deleted. However, they can be edited to reflect relevant updates.
Update attributes
To update an attribute, open the asset or record you want to change, and change the attribute value.
Work with attachment attributes
The attachment attribute type allows users to upload files to assets or records.
Uploading to attachment attributes
Depending on how the attribute type is configured, you may be allowed to upload multiple files, or you may be limited to only uploading one.
- Beside the attribute name, click Add [Attribute name].
- In the dialogue that opens, upload a file by dragging and dropping it into the browser window, or by clicking choose from your computer and selecting a file. The file appears in the attachment attribute.
Downloading attachments
To download an attachment, in the Actions column, click the Download icon ![]() , then click Download.
, then click Download.
Deleting attachments
To delete an attachment, in the Actions column, click the Delete icon ![]() , then click Remove.
, then click Remove.