Recording time
Timesheets is an app in Diligent One. You can use the Timesheets app to record time to capture work hours spent on a project or other activities.
How it works
Recording time spent on a project
To improve the accuracy and speed of recording time spent on a project, the Projects app automatically suggests time entries based on your recent activity. Timesheet entries are aggregated as high level tasks from Recent Activity, and are used to pre-populate the Project category.
High level tasks
- Admin
- Planning: projectName
- Objective: ObjectiveName
- Narrative: NarrativeName
- Risk Control Matrix: ObjectiveName
- Walkthrough: ObjectiveName
- Test Plan: ObjectiveName
- TestingRound: ObjectiveName
- Issue: IssueTitle
- Results: projectName
Automated time entry suggestions are only available when using the Timesheets page. You must record time manually if you are using the Time entries side panel or Timesheets project management tab.
Recording time spent on other activities
To record time associated with other activities, you can create time entries associated with:
- administrative tasks
- professional development
- vacation time / absences
- other organizational initiatives
Users with Timesheets Admin permissions can configure the names of non-project time categories to suit your organization's needs. For more information, see Configuring non-project time categories.
Example
Recording time spent on a project
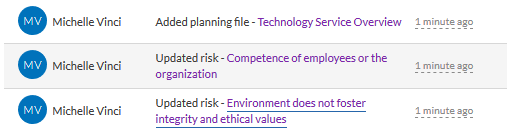
Scenario
Within the SOC Audit - Technology Service Organization project, you update two risks associated with a single objective and add a planning file:
Process
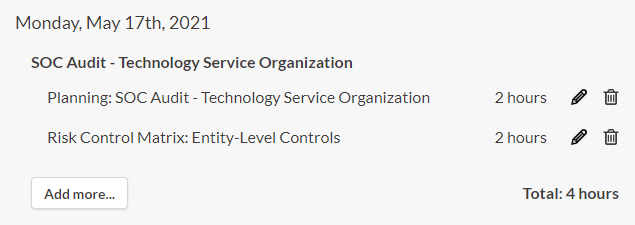
You navigate to the Timesheets page, add a time entry, select the Project category, and select the SOC Audit - Technology Service Organization project. Then, you record your planning hours, and add another time entry to record the hours spent on the Entity-Level Controls objective.
Result
The newly recorded time entry is displayed on the Timesheets page:
Permissions
Professional Managers, Professional Users, and Oversight Executives can add time entries, and edit and delete entries that they created or that have been assigned to them.
Professional Managers, Professional Users, and Oversight Executives that have been assigned the Timesheets Admin privilege can add time entries, edit and delete any time entries entered within the Diligent One instance, and modify Timesheets settings.
Record time for a single project task
Record time associated with a single project task using the Time entries side panel.
-
From the Platform home home page (www.diligentoneplatform.com), select the Projects app to open it.
If you are already in Diligent One, you can use the left-hand navigation menu to switch to the Projects app.
Note
Diligent One Platform also supports the domain www.highbond.com. For more information, see Supported domains.
- Open a project.
The project dashboard opens.
- Click the tab for the type of work that you want to record a time entry for (Planning, Fieldwork, or Results).
If you clicked the Fieldwork tab, click Go To next to the appropriate objective and navigate one of the following pages:
- Overview
- Risk Control Matrix / Project Plan
- Execute Procedures / Walkthroughs
- Testing
-
In the Utility Toolbar, click
 Time entries.
 - In the Time entries side panel, click + Add Time entries.
- Enter the following information and click Save:
Field Description Date Select the appropriate date from the calendar.
By default, the current day is selected. The date displays using the date format and time zone specified in your profile.
Hours Specify the number of hours to record, or partial hours using decimals. Description
optional
Enter information about the tasks completed or the purpose of the time entry.
NoteRich text fields cannot exceed 524,288 characters.
Tip
To enable spell check on rich text fields, do one of the following:
- Chrome, Firefox, or Safari CTRL + right-click within the field on Windows or Command + right-click on Mac
- Internet Explorer or Microsoft Edge open your browser settings and turn on spell check / highlighting of misspelled words
Project Delay? - Yes specifies that time spent was incurred because of a delay on the part of the client
- No specifies that there was no delay
The default value is No. The total amount of time recorded for project delays is displayed on the Time & Budget Tracking page.
Assigned User Select the team member responsible for the time spent.
NoteOnly Professional Managers and Professional Users can assign team members, and only Professional Managers and Professional Users can be selected from the Assigned User dropdown list.
Result The time entry displays in the Time entries side panel.
Record time for multiple tasks in different projects
Record time associated with multiple tasks performed in different projects using the Timesheets page.
-
From the Platform home page (www.diligentoneplatform.com), select the Timesheets app to open it.
If you are already in Diligent One, you can use the left-hand navigation menu to switch to the Timesheets app.
Note
Diligent One Platform also supports the domain www.highbond.com. For more information, see Supported domains.
The Timesheets page opens and displays the current week, based on the time zone set in your user profile. If time entries have been entered for the week, the total number of hours associated with the week displays on the page.
- Navigate to the appropriate day you want to add a time entry for:
- To enter time for a previous week, click < Previous Week.
- To enter time for the following week, click Next Week >.
- To enter time for the current week, scroll down the page to the appropriate day.
- Under the appropriate date, click Add Time Entry. If there are already time entries associated with that day, click Add more.
- Select the Project category if the time relates to activities you performed in Projects, or select Non-project to classify the time spent outside of project work.
- If you selected the Project category, complete the following steps:
- Select the project you worked on from the Project name dropdown list.
Up to five of the most recent projects you worked on are displayed at the top of the list. The remaining projects are sorted alphabetically, 50 at a time. You can click Show more to display the next 50, or enter a keyword or phrase in the search box to find a project by name, regardless of whether it's currently displayed in the list.
- Select the type of work you completed from the Phase dropdown list.
- Enter the hours you spent on the task.
The maximum is 24 hours.
- Optional. Enter a description of the task.
- Click Save.
The time entry is added to the list and the number of hours associated with the current week automatically updates.
- Select the project you worked on from the Project name dropdown list.
- If you selected the Non-projectcategory, complete the following steps:
Select one of the following non-project time categories:
Category Description General Admin Tracks tasks such as:
- project scheduling
- research of the industry (knowledge of the business)
- research on methodology and framework being applied to the project
Professional Development Tracks activities related to professional development, such as:
- coursework
- conferences
- professional seminars
Leave/Vacation Tracks time spent out of the office for:
- a vacation
- a leave of absence
- maternity leave
- sick leave
Organizational Initiatives Tracks collaborative time, such as:
- implementing cross-functional business processes
- enhancing collaboration between different departments
Other Tracks activities that are unrelated to any of the preceding categories - Optional. Enter a description of the task.
- Enter the hours you spent on the task.
The maximum is 24 hours.
- Optional. To add the time entry to each day in the week, select Apply to every day this week.
- Click Save.
The time entry is added to the list and the number of hours associated with the current week automatically updates.
- Optional. To add additional time entries, repeat steps 2-7.
Record project administrative time
Record time associated with a project administrative task using the Timesheets project management tab.
-
From the Platform home home page (www.diligentoneplatform.com), select the Projects app to open it.
If you are already in Diligent One, you can use the left-hand navigation menu to switch to the Projects app.
Note
Diligent One Platform also supports the domain www.highbond.com. For more information, see Supported domains.
- Open a project.
The project dashboard opens.
- Click the Timesheets project management tab.
The Time & Budget Tracking page opens.
- Click Add Administrative Time, enter the following information, and click Save:
Field Description Date Select the appropriate date from the calendar.
By default, the current day is selected. The date displays using the date format and time zone specified in your profile.
Hours Specify the number of hours to record, or partial hours using decimals. Description
optional
Enter information about the tasks completed or the purpose of the time entry.
NoteRich text fields cannot exceed 524,288 characters.
Tip
To enable spell check on rich text fields, do one of the following:
- Chrome, Firefox, or Safari CTRL + right-click within the field on Windows or Command + right-click on Mac
- Internet Explorer or Microsoft Edge open your browser settings and turn on spell check / highlighting of misspelled words
Project Delay? - Yes specifies that time spent was incurred because of a delay on the part of the client
- No specifies that there was no delay
The default value is No. The total amount of time recorded for project delays is displayed on the Time & Budget Tracking page.
Assigned User Select the team member responsible for the time spent.
NoteOnly Professional Managers and Professional Users can assign team members, and only Professional Managers and Professional Users can be selected from the Assigned User dropdown list.
Result The administrative time entry displays on the Time & Budget Tracking page. You can edit or delete an administrative time entry from this page.
Edit or delete time entries
Edit or delete time entries to appropriately record time spent on projects or other activities.
From the appropriate area, complete the following steps:
Note
- Interface terms are customizable, and fields and tabs are configurable. In your Diligent One organization, some terms, fields, and tabs may be different.
- If a required field is left blank, you will see a warning message: This field is required. Some custom fields may have default values.
| Area | Location | Steps |
|---|---|---|
| Timesheets page |
The Timesheets app |
|
| Time Report tab |
The Timesheets app Note
You can only delete a time entry from the Time Report tab. |
|
| Timesheets project management tab | The upper-right corner within any project |
|
| Time entries side panel |
Within a project, click
|
|