Managing workflows in Asset Inventory
Workflows control how assets and records move through their life-cycles. In the filing cabinet analogy, workflows are the rules for what happens to each folder and file.
How it works
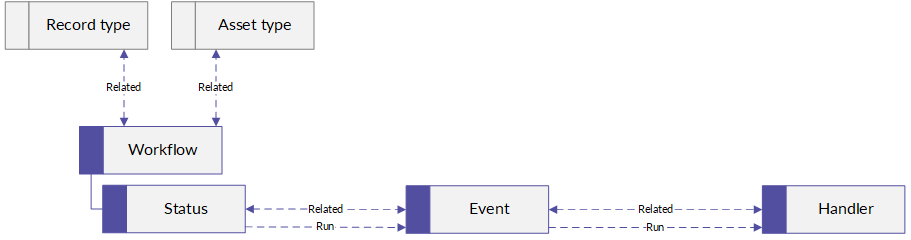
Each asset type and record type is related to a workflow. The corresponding assets and records move through that workflow.
Statuses are the steps in a workflow
A workflow has a series of statuses that represent the various states of an asset or record as it moves through its life-cycle in Diligent One. For example, a new vendor asset might begin in a default status, Draft, then move to Register, Categorize, Assess, Activate, and finally Archive.
Each workflow has a default status that cannot be deleted. Beyond that, any combination of statuses is theoretically possible.
Statuses can be, but do not need to be, linear. For example, you might want to periodically reassess an active asset, moving it from Activate back to Assess.
Similarly, assets and records are not required to advance through the entire workflow. It is fine for a critical business partner or IT asset to remain active for many years, or for a potential business partner to remain in an assessment state while you await important security or compliance changes on their end.
Events and handlers are the workhorses for each status
Each status in a workflow can be related to, and run, an event. Each event can be related to, and run, a handler.
-
An event is a link between a status and a handler, and also allows one status to transition to another status. You will frequently encounter an event as a button on Asset Inventory's visual workflow, so you can transition an asset or record to the next status.
-
A handler is a set of conditions and actions. When a handler runs, it checks its conditions, and if those conditions are satisfied, it performs its actions. For example, you can use a handler to alert someone of a change or problem in an asset or record.
Events and handlers are normally related to statuses, but they can also run independently of status changes, like with a script or a questionnaire response.
With events and handlers, you can automate activity or enforce rules on your assets and records. For example, you can check to ensure certain attributes are filled in, or reject a potential vendor after they complete a questionnaire and indicate they do not satisfy your organization's security requirements.
Visualizing it together
Create workflows with existing components
Workflows contain your business processes around assets and records. Assets and records move through various statuses throughout their lifecycle. By designing a workflow structure, you can manage and help automate asset and record lifecycles with minimal manual intervention for maximum efficiency.
The following documentation presupposes that you already have access to previously created events and handlers that you are bringing together into a workflow. If this is not the case and you need to create these items first, see Create events and Create handlers to walk you through creating these items, and come back to this section for how to put everything together.
- Open Launchpad.
- Select Platform Settings > Configuration.
- Click Workflows from either the side panel or the tile. The Workflows page opens.
- Click + Add Workflow. The Add new workflow dialog box appears.
- Give your workflow a name and optionally add a description.
- Click Add Workflow. Your newly-created workflow opens in a workflow details page with a General Information area followed by blank Statuses, Asset types, Events, and Handlers areas.
- Optional. If you want to change the name and/or description of your workflow, you can edit this in the General Information area: Click Edit. The General Information area becomes editable, and you can edit the name and description. You can also choose whether to lock the workflow.
- A Workflow ID is the technical, unique ID for this particular workflow in the organization. It is used to relate it to other resources.
- An API name is the unique name for a workflow in the organization. It is used to ensure toolkits and scripts are not creating copies of the same workflow.
- Locked workflows cannot be edited. Locked workflows are typically workflows created by Diligent One or workflows locked by a System Admin.
- Click Save. Your changes appear in on the workflows details page.
If your company uses more than one instance in Diligent One, make sure the appropriate instance is active.
Static fields such as the Workflow ID, API name, Created at and Updated at are system created and cannot be changed.
Add statuses to a workflow
At this point, you have essentially created a workflow shell. Workflows contain or are essentially a filing cabinet for a set of statuses that assets and records can cycle through. To create your workflow, you will need to add statuses for each asset or record lifecycle.
- Click + Add Status. An Add new status dialog box opens for you to fill out the Name, Description (optional), and theOrder number of the status.
Note
The order number of statuses indicates their sequence. You will want to ensure that the order number aligns with the correct sequence of the asset or record lifecycle. An order number is required in order to create the status. If you are not sure of the sequence as you create statuses, you can include a placeholder number. Once you have decided on a sequence, you can then come back and edit the order number. See Editing a status' general information.
- Click Add Status. This dismisses the dialog box and opens up the status details page.
- Repeat these steps until you have added all of your statuses for the workflow. The statuses will appear in the Statuses area of the Workflows page in a table by order number listing the name and description (if provided).
Add events to statuses from the Workflows page
Part of automating a workflow is associating events with statuses in order to transition assets and records from one status to another. An event links a status to handlers (a set of conditions that need to be met to perform actions). Previously-created events can be located and added to workflows either via the Workflows page or from the Events page. The main difference is that if you are linking your events to statuses from the Workflows page, you can only link events. Whereas from the Events page, you can link events and handlers to workflows which may be more efficient depending how you are approaching setting up your workflow. See Add events and handlers to statuses from the Events page, below.
- Open Launchpad.
Note
If your company uses more than one instance in Diligent One, make sure the appropriate instance is active.
- Select Platform Settings > Configuration.
- Click Workflows from either the side panel or the tile. The Workflows page opens.
- Click on the workflow you would like to work in. This opens the workflow details page.
- Click on the name of the status you would like to link an event to. The status details page opens.
- To add events to a status, click Manage linkages. From the Manage links page, you can search the Link Event dropdown menu to find the events you want to associate with the status.
- Select an event and click Link. The now linked event details are displayed in a table. Details include event type, shared, position, admin name, and description.
- Optional. Repeat steps 7 to add additional events.
Add events and handlers to statuses from the Events page
Part of automating a workflow is associating events with statuses to allow records and assets to transition from one status to another. An event links a status to handlers (a set of conditions that need to be met to perform actions). From the Events page, you can link events, link handlers, and reorganize the running order of handlers all from one place which may be more efficient depending how you are approaching setting up your workflow.
- Open Launchpad.
Note
If your company uses more than one instance in Diligent One, make sure the appropriate instance is active.
- Select Platform Settings > Configuration.
- Click on Events. The events page lists all of the available, existing events.
- Click on an event name. This opens the details page of the event.
- Click Manage linkages. This takes you to the Manage links page.
- Select the workflow and status you want to link to this event from their respective dropdown menus. Click Link. Once linked, the details of an event are displayed in a table. Details include the event type, shared, position, admin name, and description.
- Select a handler from the dropdown menu. Click Link. The selected handler also appears on the page.
- Optional. If you are linking multiple handlers, they are executed in sequence. To organize your handlers in the expected running order, on the Manage links page drag and drop them into the correct sequence.
Editing a status' general information
- Open Launchpad.
Note
If your company uses more than one instance in Diligent One, make sure the appropriate instance is active.
- Select Platform Settings > Configuration.
- Click Workflows. The Workflows page opens.
- Click on the workflow you would like to work in. This opens the workflow details page.
- Click on the name of the status you would like to edit. This opens the details page of the status. There are two areas you can edit: General Information and Linked object
- Click Edit. The General Information area becomes editable, and you can edit the Name, Description, Color, and Order number. You can also choose whether to lock the status, set it as a default, and/or hide the status in status tracker.
- A Status ID is the unique ID for this particular status in the organization. It is used to relate it to other resources. When setting a transition status action for a handler, you would input this ID where required in the side panel.
- The order number of statuses indicates their sequence. You will want to ensure that the order number aligns with the correct sequence of the asset or record lifecycle. An order number is required in order to create the status.
- Click Save. Your changes appear on the status details page.
Static fields such as the Status ID, Created at and Updated at are system created and cannot be changed.
Editing a status' linked objects
- Open Launchpad.
Note
If your company uses more than one instance in Diligent One, make sure the appropriate instance is active.
- Select Platform Settings > Configuration.
- Click Workflows. The Workflows page opens.
- Click on the workflow you would like to work in. This opens the workflow details page.
- Click on the name of the status you would like to edit. This opens the details page of the status. There are two areas you can edit: General Information and Linked objects.
- To add or remove events that are linked to a status, click Manage linkages. This opens the Manage links page.
- Do either of the following:
- To add events, select an event from the Link Event dropdown menu and click Link. Once linked, the details of an event are displayed in a table. Details include event type, shared, position, admin name, and description.
- To remove events, click Unlink. The event is no longer be listed in the table.
- Optional. By clicking Unlink, you can remove events from the status.
Creating event triggers for field updates
A trigger is the action required to set off (or trigger) the event. Triggers can set off notifications and run robots. They invoke events that cause handlers to run.
- Click on Events. The events page lists all of the available, existing events.
- Click on an event name. This opens the details page of the event.
- Click Add Trigger and an Add Trigger side panel appears.
- Optional. Name the trigger.
- Select Field Updated as the trigger type.
- Enter field names by clicking +Add field names
- If the conditions set for a trigger are that a field has been updated, the field name needs to be included when you create the trigger. Click Attribute types. This opens the Attribute types page.
- From the table, copy the field name that you want from the Field name column.
- Click Events. The events page lists all of the available, existing events.
- Click on the event you are editing or adding a trigger to. This opens the details page of the event.
- Click on an existing trigger name or click Add Trigger. The Add Trigger side panel appears.
- Click +Add field names and paste the field name.
- Go back to Launchpad.
- Select Platform Settings > Configuration.
- Click on Events. The events page lists all of the available, existing events.
- Click on the event you are editing or adding a trigger to. This opens the details page of the event.
- Click on an existing trigger name or click Add Trigger. The Add Trigger side panel appears.
- Select Questionnaire Responded as the trigger type.
- Click +Add questionnaire ids and paste the questionnaire ID into the provided field.
- Click Save. The newly-added trigger appears in the Triggers area.
Creating event triggers for questionnaire response
Set off events base on whether a questionnaire receives a response.
- Click on Events. The events page lists all of the available, existing events.
- Click on an event name. This opens the details page of the event.
- Click Add Trigger and an Add Trigger side panel appears.
- Optional. Name the trigger.
- Select Questionnaire Responded.
- Add questionnaire IDs.
- Go to Launchpad.
- Open the Results app.
- Click on the collection name with the questionnaire you want to associate with this trigger.
- Click on the Questionnaires tab. This will show a list of available questionnaires.
- Click on the name of the questionnaire you want. This opens the questionnaire details page.
- In the URL, highlight and copy the questionnaire ID number. The ID number is the collection of numbers after the last forward slash in the URL.
- Click Save. The newly-added trigger appears in the Triggers area.
| Event triggers and actions (causes an event to run) | Notify | Transition Status | Run Robot |
Send Questionnaire Manual distribution |
Send Questionnaire Automated distribution |
|---|---|---|---|---|---|
| Button event click | Yes | Yes | Yes | Yes | No |
| Field Updated trigger | Yes | No | Yes | N/A | Yes |
| Questionnaire responded trigger | Yes | No | No | N/A | No |
Editing event triggers
- Click on the trigger name. The Edit Trigger side panel opens.
- Make your desired changes, and click Save. Your changes are applied to the trigger.
Removing event triggers
- Click on the trigger name. The Edit Trigger side panel opens.
- Click Delete. The trigger is removed from the Trigger area of the event.
Caution
Selecting Delete permanently deletes the trigger. This cannot be undone.
Create events
An event is a workflow component that acts as a link between a status and a handler that also allows one status to transition to another status. The following covers how to create events that can be added to workflows.
- Open Launchpad.
- Select Platform Settings > Configuration.
- Click Events. The events page listing all of the available, existing events opens.
- Click + Add Event. This launches the Add new event dialog box where you can fill in the Admin name, Description (optional), Event type, and Position. There are three event types to choose from: Button, Overflow, and Hidden.
- Once complete, click Add Event. This launches the details page where you can access and/or edit general information, linked objects (statuses and handlers), and triggers.
If your company uses more than one instance in Diligent One, make sure the appropriate instance is active.
| Event type | Description |
|---|---|
| Button | This is triggered from a status actions list. This is triggered when a status button is clicked from the status dropdown on an asset or asset record. |
| Overflow | Overflow is similar in concept to the button event type, but it is intended for administrators. Essentially, a button is clicked from the Overflow dropdown and this triggers associated events. |
| Hidden | These are preset, automated events that react to in response to trigger conditions being met. |
Editing events
- Open Launchpad.
- Select Platform Settings > Configuration.
- Click Events. The events page listing all of the available, existing events opens.
- Click on the name of an event you want to edit. This opens the event details page.
- Click Edit. The General Information area becomes editable, and you can edit the Name, Description, Display name, Event type, and Position number. You can also choose to indicate whether the event is shared.
- Click Save. Your changes appear on the event details page.
If your company uses more than one instance in Diligent One, make sure the appropriate instance is active.
Static fields such as the Event ID, Created at, and Updated at are system created and cannot be changed.
As a best practice, decide whether an event is meant to be used in multiple workflows and select Shared to indicate this visually and to help keep track of events that may be linked to other workflows. Otherwise, this is not captured automatically.
Create handlers
Handlers perform actions if conditions are met. For example, handlers can be used to automate tasks such as sending alerts when something changes in an asset or asset record.
- Open Launchpad.
- Select Platform Settings > Configuration.
- Click Handlers. The Handlers page listing all of the available, existing handlers opens.
- Click + Add Handler. An Add new handler dialog box appears where you can name the handler and add a description (optional).
- Click Add Handler. This opens a details page for the handler you just created.
- Click Edit. The General Information area becomes editable, and you can edit the Name and Description. You can also choose to indicate whether the handler is shared.
- Click Save. Your changes appear in on the handlers details page.
If your company uses more than one instance in Diligent One, make sure the appropriate instance is active.
Static fields such as the Handler ID, Created at, and Updated at are system created and cannot be changed.
As a best practice, decide whether a handler is meant to be used in multiple workflows and select Shared to indicate this visually and to help keep track of handlers that may be linked to other workflows. Otherwise, this is not captured automatically.
Linking objects to handlers
- From the selected handlers detail page, click Manage linkages. This opens the Manage links page.
- From the Link Event dropdown menu, select events to link to the handler.
- Click Link. The event you select appears on the Manage links page. You can add multiple events.
Creating handler conditions
- From the selected handlers detail page, click Add Condition. An Add Condition side panel appears.
- Optional. Name the handler.
- Select a condition type. Depending on the condition type selected, there are different fields to fill out. Do one of the following:
- If you select All fields are required, choose or create a custom failure message, and click Save. The newly-added condition appears in the Conditions area.
- If you select Field value comparison, select a Field, select an Operator, and input a Value. Choose or create a custom failure message and click Save. The newly-added condition appears in the Conditions area.
- If you select Specific fields are required, select a Condition type, add Field names, choose or create a custom failure message, and click Save. The newly-added condition appears in the Conditions area.
- Choose whether any or all of the following conditions apply from the dropdown under the Conditions area.
- Choose what you want to happen if a condition fails. Select either Stop all handlers for this event or Stop this handler for the current item.
- Choose how failure messages are to be handled. Select one of the following:
- Show the default failure message.
- Show a custom error message. If you select this option, a Custom failure message text box opens so you can enter a custom message.
- Don't show a failure message.
- Click Save. Your changes appear in the handlers detail page.
| Handler condition type | Description |
|---|---|
| All fields required | All required attributes associated with an asset or record must have values. Attribute comparison (e.g., risk_score >=5). |
| Field value comparison | All attribute types marked "required" must be populated (i.e., not empty). |
| Specific fields are required | Selected attribute types must be populated. |
Creating handler actions
- From the selected handlers detail page, click Add Action. An Add Action side panel appears.
- Optional. Name the action.
- Select an action type. Depending on the action type selected, different fields are available to fill out. Do one of the following:
- If you select Transition status, add the Status ID, choose a success message option, and click Save. The newly-added action appears in the Actions area. The Transition status handler action moves the asset or asset record to a different status in the workflow that you specify. For instructions on how to retrieve the Status ID, see Retrieving and inputting a Status ID for a handler with a transition status action type.
- If you select Notify, this action sends an email to an address you specify. Once selected, add email address, subject, body, and click Save. The newly-added action appears in the Actions area.
- If you select Run robot, add the Task ID (see Retrieving and inputting a task ID for a handler with a run robot action type), and click Save. The newly-added action appears in the Actions area. Run a Workflow robot. A Workflow robot allows you to run a custom script to perform custom actions within your Asset Manager environment. For more information, see Working with files in a HighBond robot or a Workflow robot.
- If you select Sent questionnaire, you can choose whether questionnaires are released manually or automatically:
- If questionnaires are being sent manually (e.g., via an API or UI), add questionnaire IDs, add questionnaire context fields, and click Save. Clicking a button, sends a questionnaire to the user of your choosing.
- If questionnaires are being sent automatically, select a field where the recipient email or user info is stored, add sent questionnaire ID, add questionnaire context fields, and click Save. The newly-added action appears in the Actions area. Automatically send a predefined questionnaire to a specified user and/or email address. The automated distribution type is currently only available when used in conjunction to a hidden event set up with a Field Updated trigger.
A success message appears when action types are successfully completed. Especially since some of these actions take place in the background. This is a way to let you know that things are running as expected.
Retrieving and inputting a status ID for a handler with a transition status action type
When you want to move an asset or asset record to another status, you need to specify the Status ID it moves to when the handler that controls these conditions is actioned.
- Open Launchpad.
Note
If your company uses more than one instance in Diligent One, make sure the appropriate instance is active.
- Select Platform Settings > Configuration.
- Click Workflows. The Workflows page opens.
- Click on the workflow you would like to work in. This opens the workflow details page.
- Click on the status you want the asset or asset record to move to. This opens the status details page.
- From the General Information area, highlight and copy the unique identifier under Status ID.
- Go back to the workflow, click on the status you want to move from. This opens the status details page.
- Click on the appropriate event. This opens the event details page.
- Click on the appropriate handler. This opens the handler details page.
- Click Add Action. The Add Action side panel opens.
- Optional. Include a name that clearly indicates what the action should accomplish such as "Transition to x status".
- Select Transition status as the action type.
- In Status ID, paste the unique identifier of the status the asset or asset record should transition to.
- Choose whether to show a success message to confirm that the handler has run as expected.
- Click Save.
Retrieving and inputting a task ID for a handler with a run robot action type
In order to run a robot, you need a task ID.
- Open Launchpad.
Note
If your company uses more than one instance in Diligent One, make sure the appropriate instance is active.
- Open the Robots app.
- Click Workflow Robots.
- Select the appropriate task. This opens the task details page.
- Click on the task name. The Task details side panel opens.
- Highlight and copy the Unique identifier number.
- From the selected handlers details page, click Add Action.
- Select Run robot as the action type and past the task ID into the Task ID area.
- Select a success message option.
- Click Save.
Editing linked objects connected to handlers
- Click Manage linkages. This opens the Manage links page.
- From the Link Event dropdown menu, select events to link to the handler.
- Click Link. The event you select appears on the Manage links page. You can add multiple events.
- Optional. Click Unlink beside any event you want to remove. The event is removed from the table.
Editing handler conditions
- To edit conditions, click on the condition name on the handler details page. The Edit Condition side panel opens.
- Make your desired changes and click Save. Your changes are applied to the condition. For more details on the changes you can make to handler conditions, see Creating handler conditions.
Removing handler conditions
- To remove conditions, click on the condition name. The Edit Condition side panel opens.
- Click Delete. The condition is removed from the Conditions area.
Caution
Selecting Delete permanently removes a condition. This cannot be undone.
Editing handler actions
- To edit actions, click on the action name on the handler details page. The Edit Action side panel opens.
- Make your desired changes and click Save. Your changes are applied to the action. For more details on the changes you can make to handler actions, see Creating handler actions.
Removing handler actions
- To remove actions, click on the action name. The Edit Action side panel opens.
- Click Delete. The action is removed from the Actions area of the handler.
Caution
Selecting Delete permanently removes an action. This cannot be undone.
Delete workflows and workflow components
You can delete entire workflows when you no longer have use for them and want to keep your environment up to date and organized by removing them. You can also delete workflow components (e.g., statuses and events) as a way of managing and/or iterating on existing workflows. That said, it is important to note that deleting a workflow or a workflow component is permanent and cannot be undone.
Deleting workflows
- Open Launchpad.
- Select Platform Settings > Configuration.
- Click Workflows. The Workflows page opens.
- Click on the workflow you would like to delete. This opens the workflow details page.
- Click Delete. This prompts a Confirm delete? dialog box with a warning message.
- Click Delete. This deletes the workflow which will no longer appear in the list of workflows.
If your company uses more than one instance in Diligent One, make sure the appropriate instance is active.
Caution
If you choose to delete a workflow, it is permanently deleted along with its statuses and links to events. However, linked events and/or handlers will not be deleted. You also cannot delete workflows that are linked to an asset type, asset record type, locked, and/or system controlled.
Deleting statuses
- Open Launchpad.
- Select Platform Settings > Configuration.
- Click Workflows. The Workflows page opens.
- Click on the name of the workflow you would like to delete. This opens the workflow details page.
- Click on the name of the status you would like to delete. This opens the details page of the status.
- Click Delete. This prompts a Confirm delete? dialog box with a warning message.
- Click Delete. The status is deleted.
If your company uses more than one instance in Diligent One, make sure the appropriate instance is active.
Caution
Selecting Delete permanently deletes the status and any links to events. However, you cannot delete statuses that are linked to an asset type, record type, locked, system controlled, and/or with a default status on a workflow.
Deleting events
- Open Launchpad.
- Select Platform Settings > Configuration.
- Click Events. The Events page listing all of the available, existing events opens.
- Click on the name of the event you would like to delete. This opens the events details page.
- Click Delete. This prompts a Confirm delete? dialog box with a warning message.
- Click Delete. The event is deleted and no longer listed.
If your company uses more than one instance in Diligent One, make sure the appropriate instance is active.
Caution
Selecting Delete permanently deletes the event and any linked triggers. This cannot be undone.
Deleting handlers
- Open Launchpad.
- Select Platform Settings > Configuration.
- Click Handlers. The Handlers page listing all of the available, existing handlers opens.
- Click on the name of the handler you would like to delete. This opens the handler details page.
- Click Delete. This prompts a Confirm delete? dialog box with a warning message.
- Click Delete. The handler is deleted.
If your company uses more than one instance in Diligent One, make sure the appropriate instance is active.
Caution
Selecting Delete permanently removes the handler along with its conditions and actions. This cannot be undone.